Cisco SPA Devices
The PBX is able to automatically provision Cisco SPA devices through zero-touch LAN provisioning, DHCP option 66 and through manual entry of the provisioning URL in the phone GUI.
In order to use features like TLS and SRTP, you should upgrade the phones to firmware 7.6.2. This will also store the credentials for the provisioning in the phone, so that you don't have to open the MAC for provisioning every time that you want to reprovision the phone.
Provisioning
When provisioning a Cisco SPA phone, like SPA504G or SPA525G etc., or a Cisco ATA, like SPA112, you should first set the required settings on the PBX as shown in provisioning document Steps Before Provisioning.
SPA504G or SPA525G require at least 2 line buttons to be provision on the phone.
It is important to note in the document "Steps Before Provisioning", how to map the MAC address of the phone to the PBX extension using Device Management.
It is also important to note in the document Steps Before Provisioning, under "Configuring the Domain Settings", the "Provisioning Parameters".
The Authentication user, Authentication password and Authentication PIN settings allow administrators to provision phones and log into a phone's web interface remotely. These settings enable administrators to use identical usernames and passwords for all devices in a domain, simplifying the authentication process from the GUI of the phone. The password will bypass users' passwords (the web interface passwords), so users will not be able to use their passwords; hence, this setting can be used to keep users out of the phone's web interface and prevent them from inadvertently changing anything.
For provisioning buttons, the setting up of buttons is described in buttons. There, you will see how to prepare a new buttons profile, how to set up the individual buttons (like BLF) and how to map that profile to a specific extension. The numbers for the buttons correspond to the buttons on the phone. If a number is not added in the profile, that button will not be set on the phone.
Open MAC Provisioning
For security reasons, navigate to the Device Management under Tenant Advance settings and start provisioning for the Device i.e. click on the MAC address and then click on Start.
Cisco SPA Phone Settings for Auto Provisioning
You can manually tell the phone from where it should load the configuration either through the web interface of the phone or through the phone keyboard. If you want to use the phone keyboard, select the Profile Rule entry in the interface, though it seems to be much easier through the web interface.
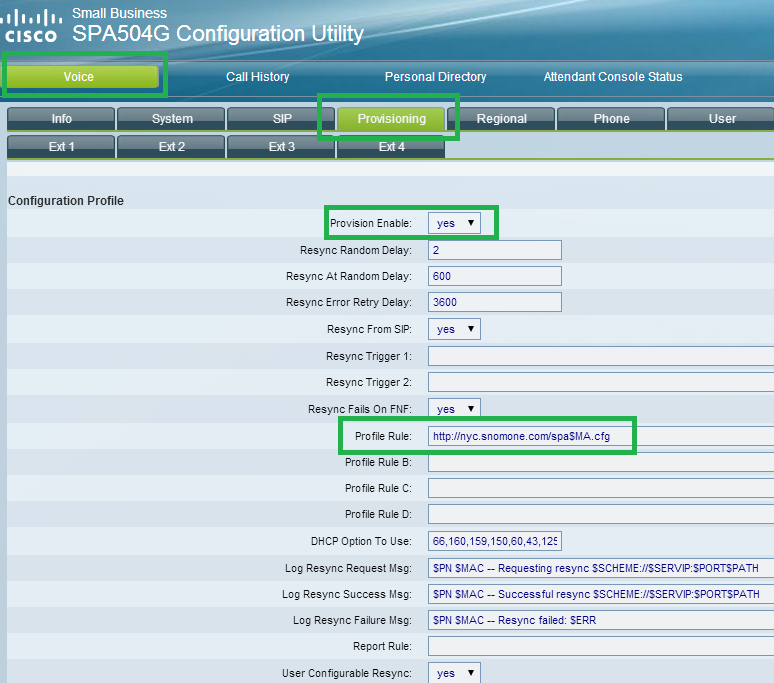
If you choose to use the web interface, log into the web interface of the phone, and according to the model, navigate to the page where you can enter the provisioning server address. In models SPA504G and SPA525G, the setting is called Profile Rule found on page "Admin" → "Advanced" provisioning tab as shown below. In other models it could be on another page that needs to be found from the documentation of the respective model.
In Profile Rule setting, add this URL http://PBXIP/spa$MA.cfgwhere the PBXIP is the IP or a resolvable DNS name of the PBX server.
Make sure that Provision Enable (if present) is set to "yes".
Press "Submit All Changes". Either the phone will reboot by itself or you can reboot the phone for provisioning.
Setup Devices in LAN
If your phone is in the same LAN as the PBX, then you don't have to do many of the above things and simply be able to provision almost any phone with a single press of a button by using this feature of the PBX. Make sure the phone is factory reset (or at least have the default username and password). You still have to do the Steps Before Provisioning but after that, just go to the PBX page Setup Devices in LAN where the PBX will show you all the phones it has automatically detected in the LAN. You simply choose the phones you want to provision, assign each one a domain and extension and press "Setup", and that's it. The phones will be provisioned. For details on this feature, please go to: Setup Devices in LAN.