CISCO 3PCC
The Vodia PBX is able to automatically provision Cisco 3PPC devices (68xx, 78xx and 88xx) through zero-touch LAN provisioning. This example is based on the 8841 model but will also work for Cisco phone 7800 and 6800 series. The devices should be running sip88xx.11-0-0MPP-7.loads or the [latest build available](https://software.cisco.com/download/home/286255328/type/282074288/release/11.0(0.7) MPP) .
Supported Devices
Vodia supports Cisco IP phones that run Multiplatform (MPP / 3PCC) firmware.
6800 Series (MPP-only)
- 6841
- 6851
7800 Series (MPP models)
- 7821-3PCC
- 7841-3PCC
- 7861-3PCC
8800 Series (MPP models)
- 8832-3PCC
- 8841-3PCC
- 8845-3PCC
- 8851-3PCC
- 8861-3PCC
- 8865-3PCC
9800 Series (MPP models)
- DP-9841-3PCC
- DP-9851-3PCC
- DP-9861-3PCC
- DP-9871-3PCC
Models ending in “-K9” are Cisco Enterprise (CUCM) phones and are not supported for direct use with Vodia.
Provisioning
When provisioning a Cisco 3PPC desktop phone you should first set the required settings on the Vodia PBX as shown in provisioning document Steps Before Provisioning .
The Authentication user, Authentication password and Authentication PINsettings, enable administrators to use identical usernames and passwords for all devices in a particular domain, simplifying the authentication process from the GUI of the phone when the phone is provisioned to the Vodia PBX.
Steps to Manually Provision Cisco Devices
-
Factory reset the Cisco phone
Start with a factory reset so the phone does not keep any old provisioning, SIP, or admin settings. Power down the Cisco phone. Hold the # key. While holding #, power the phone back on. Keep holding # until the mute key light turns off. Start entering the reset sequence: 123456789*0# When you press 1 to begin the sequence, the headset light will turn off to confirm the sequence has started. After the full sequence is entered, the phone will factory reset and reboot.
-
Create or confirm the Vodia extension In the Vodia PBX, create or open the user/extension that will be assigned to the phone. Create a Vodia Extension. Ensure you set a Web and SIP password. You will use this to login to the phone’s address after it has been provisioned.
-
Add the device in Vodia Device Management Before manually configuring the phone, add the device in Vodia so the PBX knows which phone is being paired and which extension belongs to it.
In Vodia, go to: Tenants → Advanced → Device Management Then add the phone using the MAC tab.
Enter the device details: Name: a friendly device name, for example Reception Cisco Phone Extension: select the Vodia extension/user that should be assigned to the phone MAC address: enter the phone’s MAC address Serial number: enter the phone serial number, if available Vendor / Manufacturer: select Cisco Model: select the correct Cisco model, for example CP-8851, CP-8861, etc.
SIP transport: leave as default unless the PBX administrator has specified UDP, TCP, or TLS
The most important value is the MAC address. Make sure it matches the phone exactly.
Example MAC formats: Phone label/display format: 70:6X:XX:XX:X4:9C Provisioning filename format: 706XXXXXX49C (add this in Vodia)
After adding or selecting the phone, start pairing:
Select the phone → Please select an action → Start Pairing
The PBX keeps the pairing active for approximately 30 minutes.
If the pairing window expires, select the phone again and click: Start Pairing
-
Connect the phone to the network
Connect the Cisco phone to the network and allow it to obtain an IP address using DHCP. On the phone, check the IP address from the device menu: Applications → Status → Network Status
Make sure the phone has: IP address Gateway DNS server NTP server or valid time source
-
Log in to the Cisco web interface Open a browser and go to: http://phone-ip-address/
Then select: Admin Login → advanced
-
Configure Vodia provisioning If using Vodia provisioning, go to:
Voice → Provisioning
Set the Profile Rule to the provisioning URL provided by the Vodia administrator.
Example format: https://PBXIP/csc$MA.cfg
After setting the Profile Rule, click: Submit All Changes
The phone will automatically provision without the need for reboot.
Hardware Versions (VID)
Cisco assigns a hardware revision identifier called a Version ID (VID).
The VID is printed on the label on the back of the phone and is also visible under:
Applications → Status → Product Information
Some models require specific hardware versions for newer MPP firmware.
6800 Series
- No Cisco-documented VID restrictions for MPP firmware
7800 Series
- 7811 – all VIDs supported
- 7821 – VID V03 to V24
- 7841 – VID V04 or later
- 7861 – VID V03 or later
- 7832 – all VIDs supported
8800 Series
-
8811 / 8841 / 8851 / 8861
- VID V15 or later must run MPP 11.3.3 or newer
- Cannot downgrade below 11.3.3
-
8832
- VID V08 or later requires MPP 12.0.2 or newer
- Cannot downgrade below 12.0.2
Firmware Types
Cisco Enterprise (CUCM)
Cisco Enterprise (CUCM) firmware is not used in Vodia environments and is not covered in this guide.
Multiplatform (MPP / 3PCC)
Multiplatform firmware is SIP-based firmware used for third-party PBXs such as Vodia.
It is distributed as ZIP archives containing a .loads firmware file.
Vodia recommends upgrading Cisco Multiplatform (MPP / 3PCC) phones using the Upgrade Rule. This method is persistent, provisioning-friendly, and suitable for production deployments.
Before you begin, host the firmware files on an HTTP or TFTP server. On a Vodia PBX, you can use the built-in TFTP directory located at:
/usr/local/pbx/tftp
If the directory does not exist, create it manually.
Download the correct Cisco MPP firmware for your phone model and extract the ZIP archive. Copy the .loads firmware file (and accompanying files) to your HTTP or TFTP server.
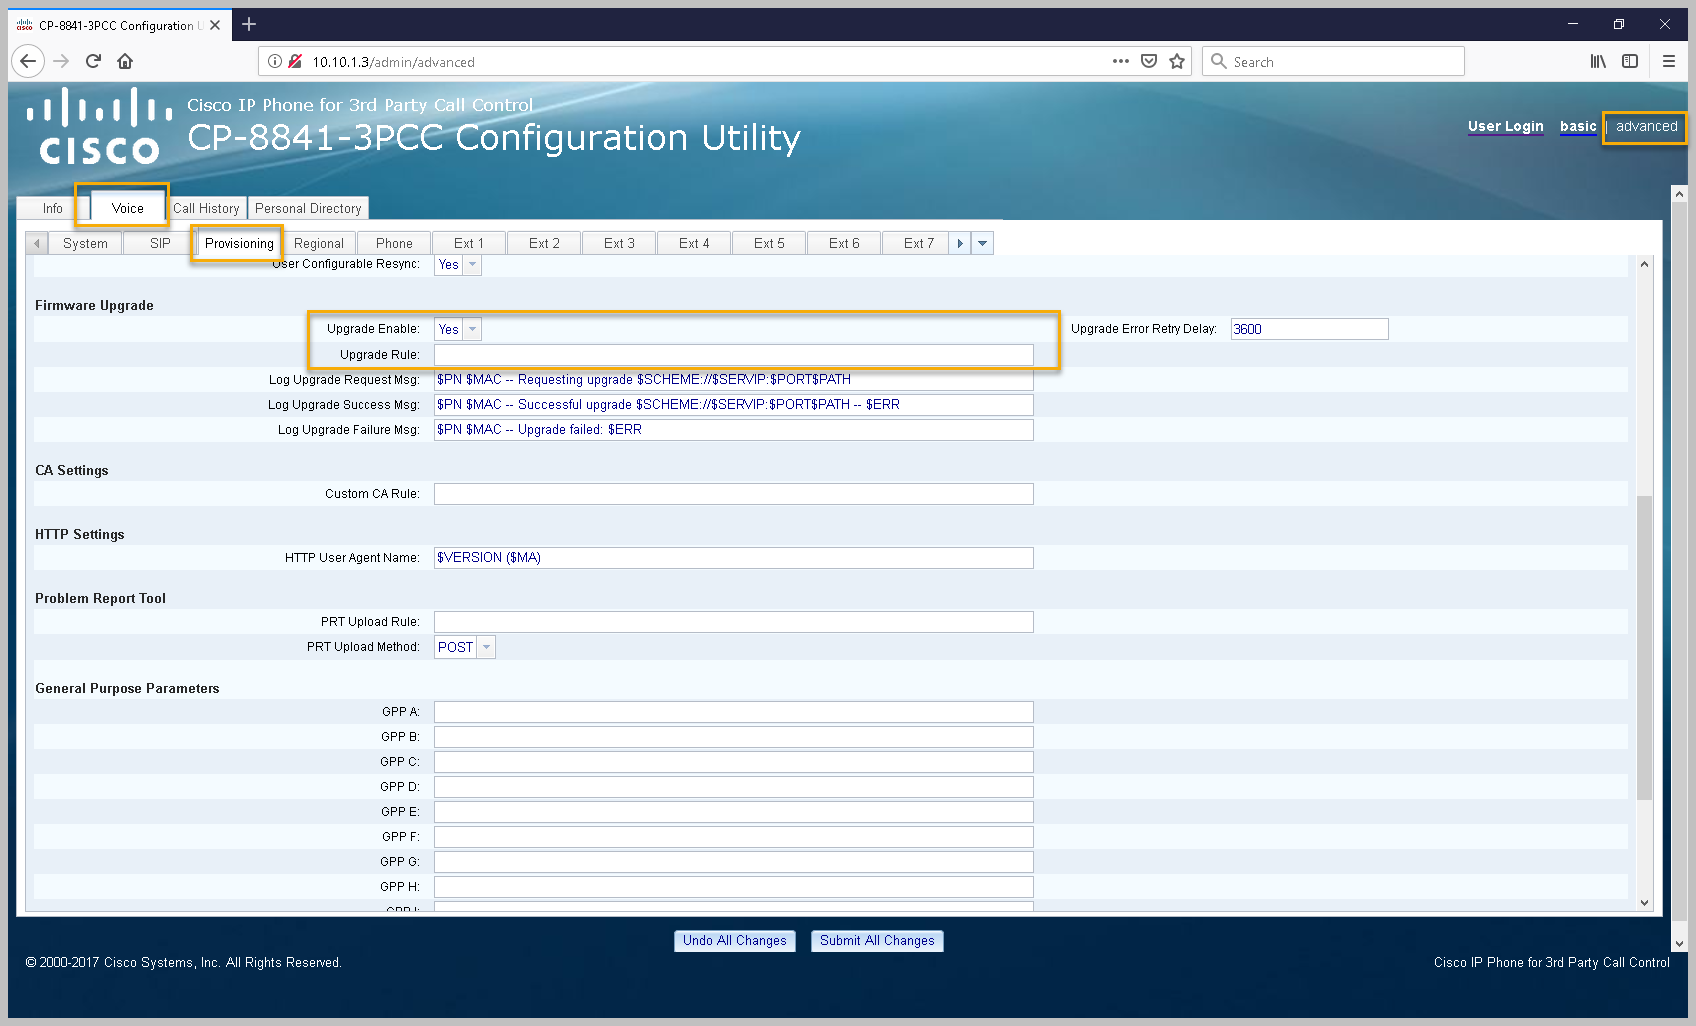
Firmware Upgrade Using Upgrade Rule (Recommended)
-
Open the phone’s web interface at:
http://phone_ip -
Click Admin Login, then select Advanced.
-
Navigate to: Voice → Provisioning
-
Ensure Upgrade Enable is set to Yes.
-
In the Upgrade Rule field, enter the full URL to the firmware .loads file, for example:
'http://server_ip/sip88xx.11-0-0MPP-7.loads'
-
Save the configuration.
The phone will download the firmware automatically and may reboot multiple times. Do not power off the phone during the upgrade process.
After completion, verify the firmware under: Applications → Status → Product Information
Alternative Method – Cisco Browser-Based Upgrade
Cisco also documents a browser-based upgrade method that triggers a one-time firmware update. This method is useful for manual upgrades or recovery scenarios but is not recommended for large-scale deployments.
-
Host the firmware files on an HTTP, HTTPS, or TFTP server.
-
Determine the phone’s IP address under: Applications → Status → Network Status
-
From a browser on the same network, navigate to:
'http://phone_ip/admin/upgrade?tftp://server_ip/firmware.loads'
-
Wait for the phone to download the firmware and reboot automatically.
After the upgrade, confirm the new firmware version under: Applications → Status → Product Information
Verification
On the phone:
- Applications → Status → Product Information
- Confirm Software Version and Hardware Version (VID)
On the Vodia PBX:
- Confirm the extension is registered
- Check User → Registrations
Best Practices
Always review Cisco MPP firmware release notes before upgrading. Avoid remaining on MPP 11.1.1 due to Cisco-documented upgrade issues. Test new firmware on a single phone before deploying broadly. Never interrupt power during a firmware upgrade. Maintain a consistent firmware baseline across all deployed phones.
Setup Devices In LAN
If your phone is in the same LAN as the PBX, you can provision the Cisco 3PCC devices by visiting the (Phones in the LAN ) under the Administrator level (Phones→LAN Devices ). Make sure the phone is factory reset (or at least has the default username and password).
- Version 69
- Version 70

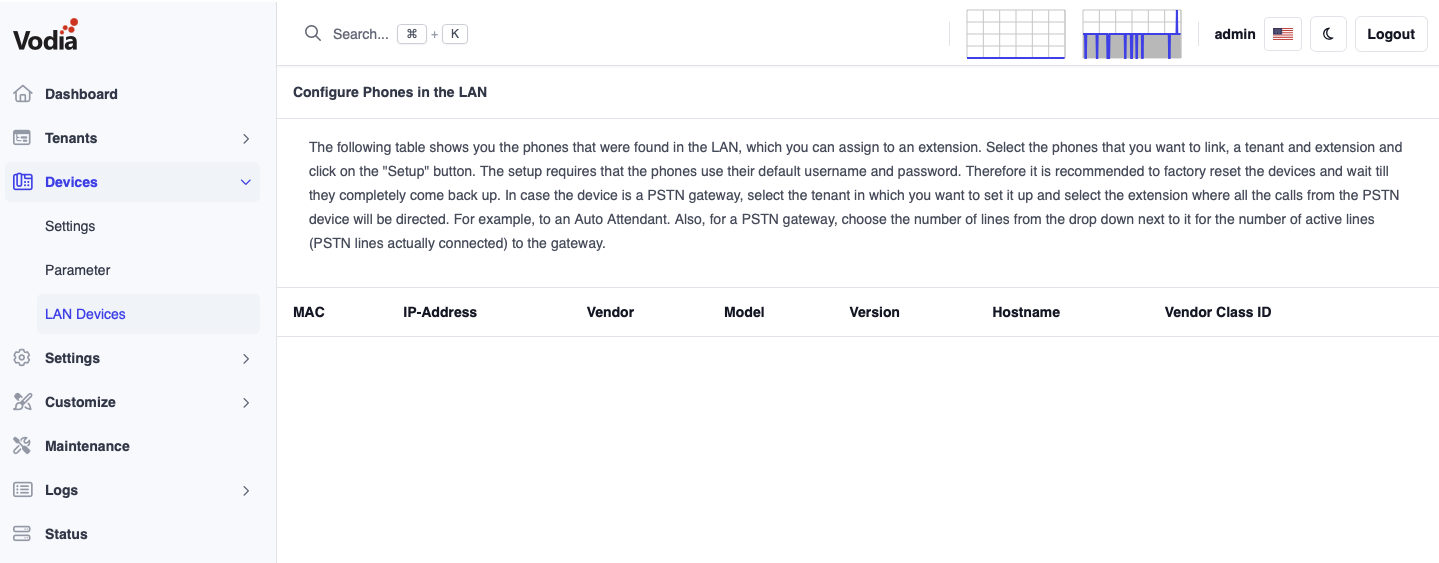
Setup The Extension
Make sure Steps Before Provisioning is complete before proceeding to provision. Continue and choose your Cisco 8800 phone you want to provision, assign each one a domain and extension and press "Setup", and that's it.
The Cisco 8800 will reboot and then be provisioned to the Vodia PBX.
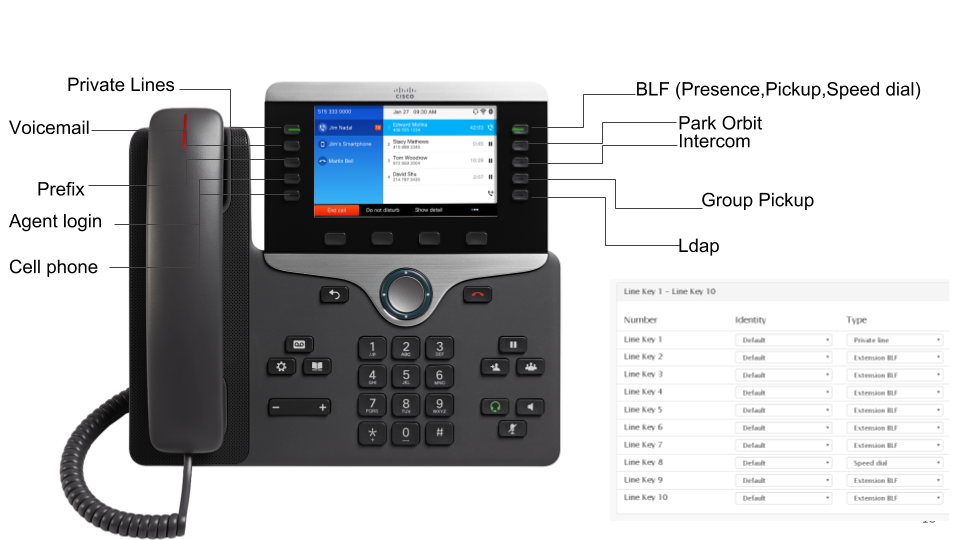
Provisioning Buttons
For a full description visit (buttons). There, you will see how to prepare a new buttons profile, how to set up the individual buttons (like BLF) and how to map that profile to a specific extension. The numbers for the buttons correspond to the buttons on the phone.