Buttons
Most desktop phones have buttons that the user can program. Those buttons usually have a light associated with them; some have a small display next to them that can provide additional information about the state of the button. The PBX provides a simple way to provision the most popular functions through the web interface both in tenant administrator mode as well as from the user front end.
Button profiles can be assigned to an individual device. In that case they affect only that specific device. It is also possible to set up a template for multiple devices.
Buttons are programmed through the provisioning mechanism. The PBX will generate the neccessary provisioning information automatically.
Assigning buttons
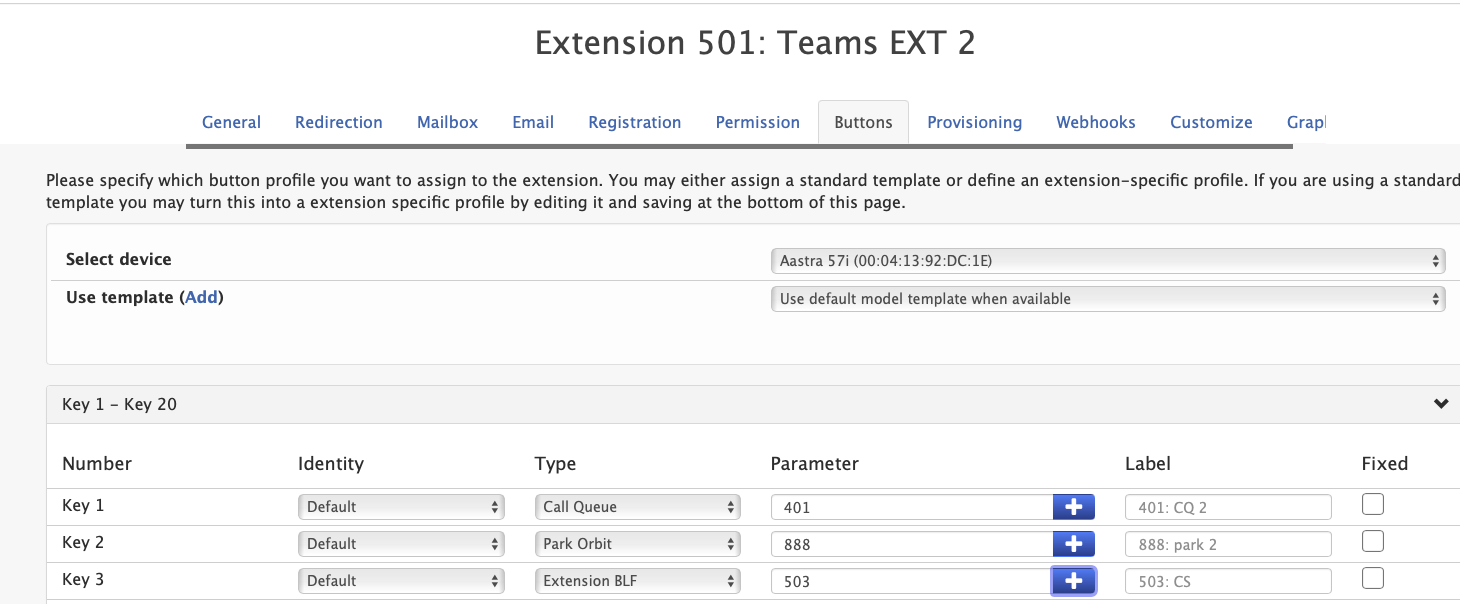
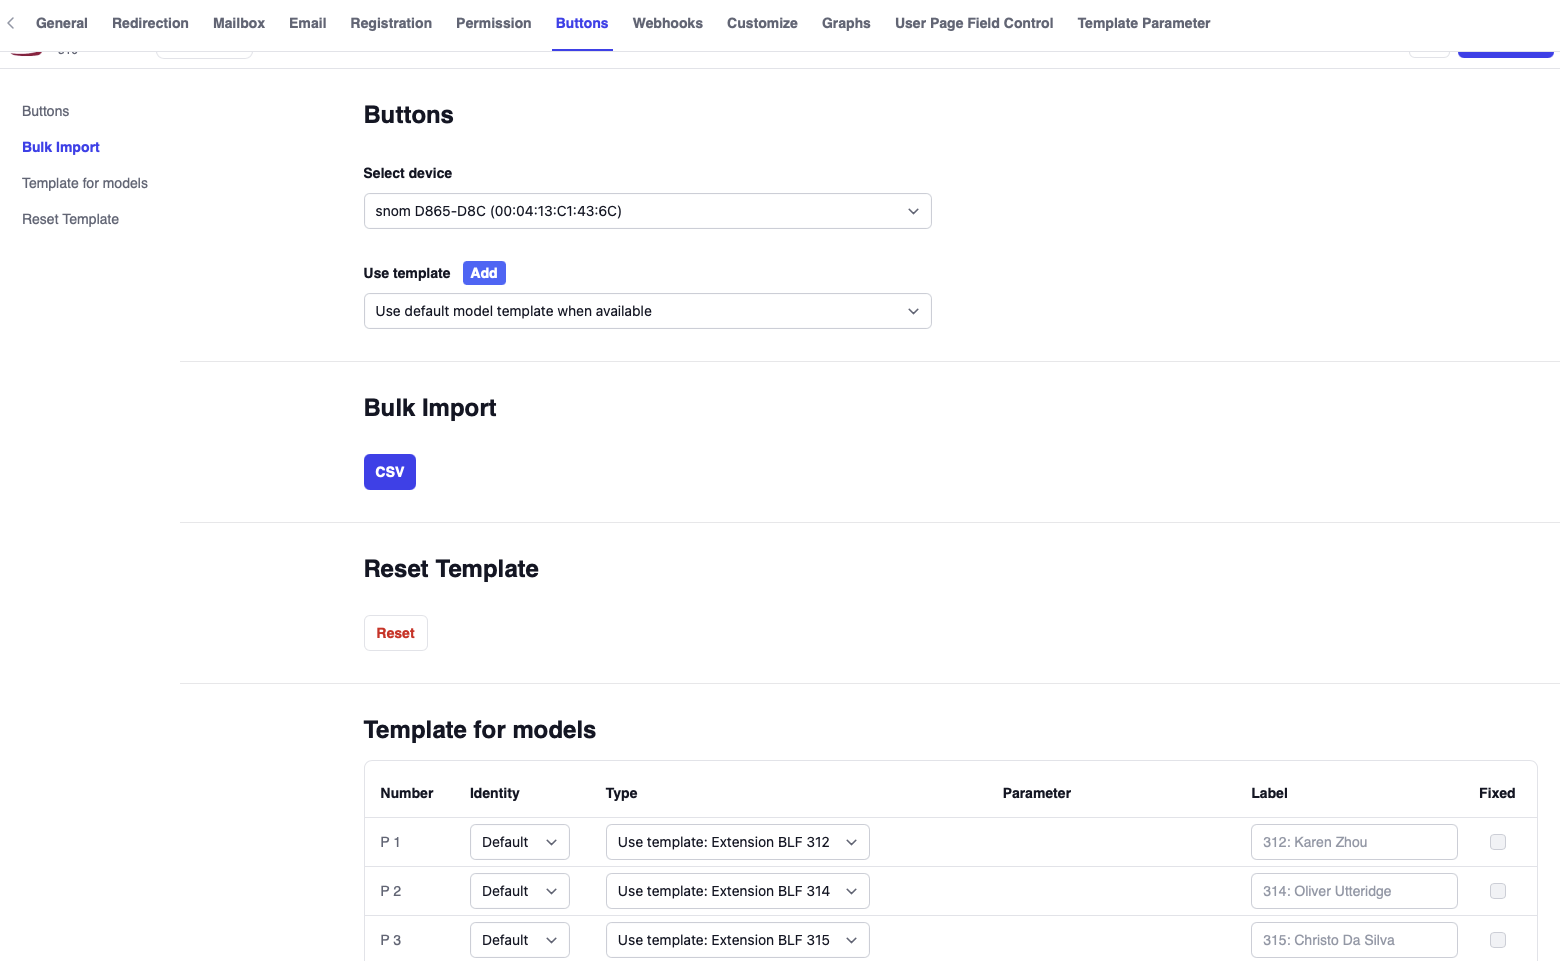
In order to assign buttons to a specific device, navigate to the extension that was assigned to the device and then select the button tab. In user mode, select the button item from the settings menu.
When a button template is available for the device, this will define the setting for the buttons that are not explicitly set.
After saving the button, the system will request the phones to reload their provisioning information. On most devices, this will take a few seconds and does not require a reboot of the device.
You can use the CSV import function to copy and paste button assignments from one device to another. This is much faster than entering the information for each device.
When the button map has changed for a device (for example, because of a software upgrade), you can use the reset button to re-asign the available buttons to the device. If you copy the button assignment as CSV, you can after the reset easily use the same to set up a similar assignment.
Buttons can be assigned at the Extension level or by creating a template at the Tenant level
Extension level
- Version 69
- Version 70
Tenant level
- Version 69
- Version 70
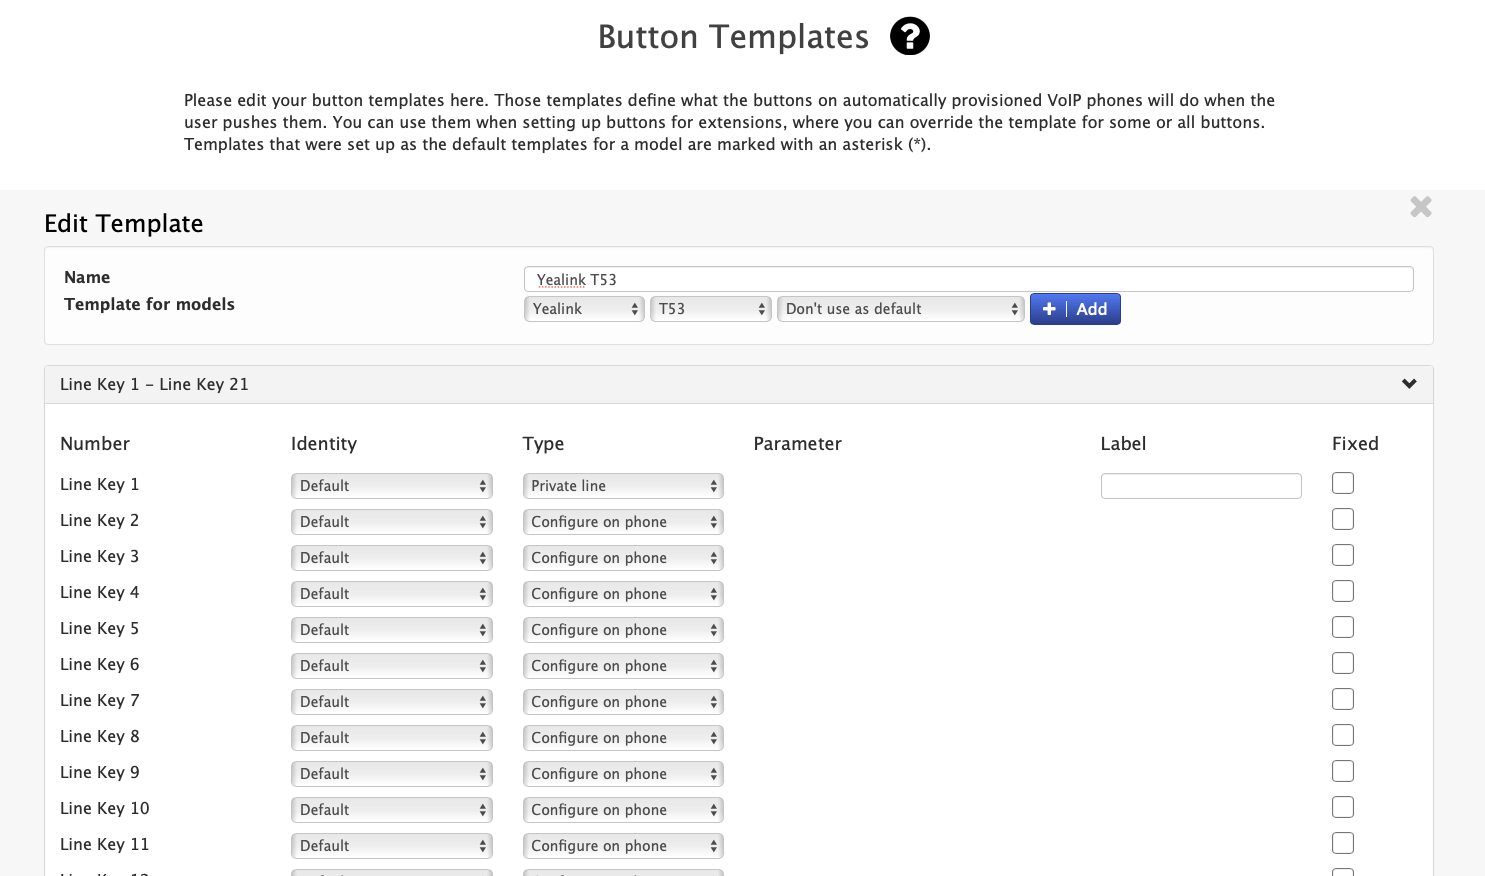
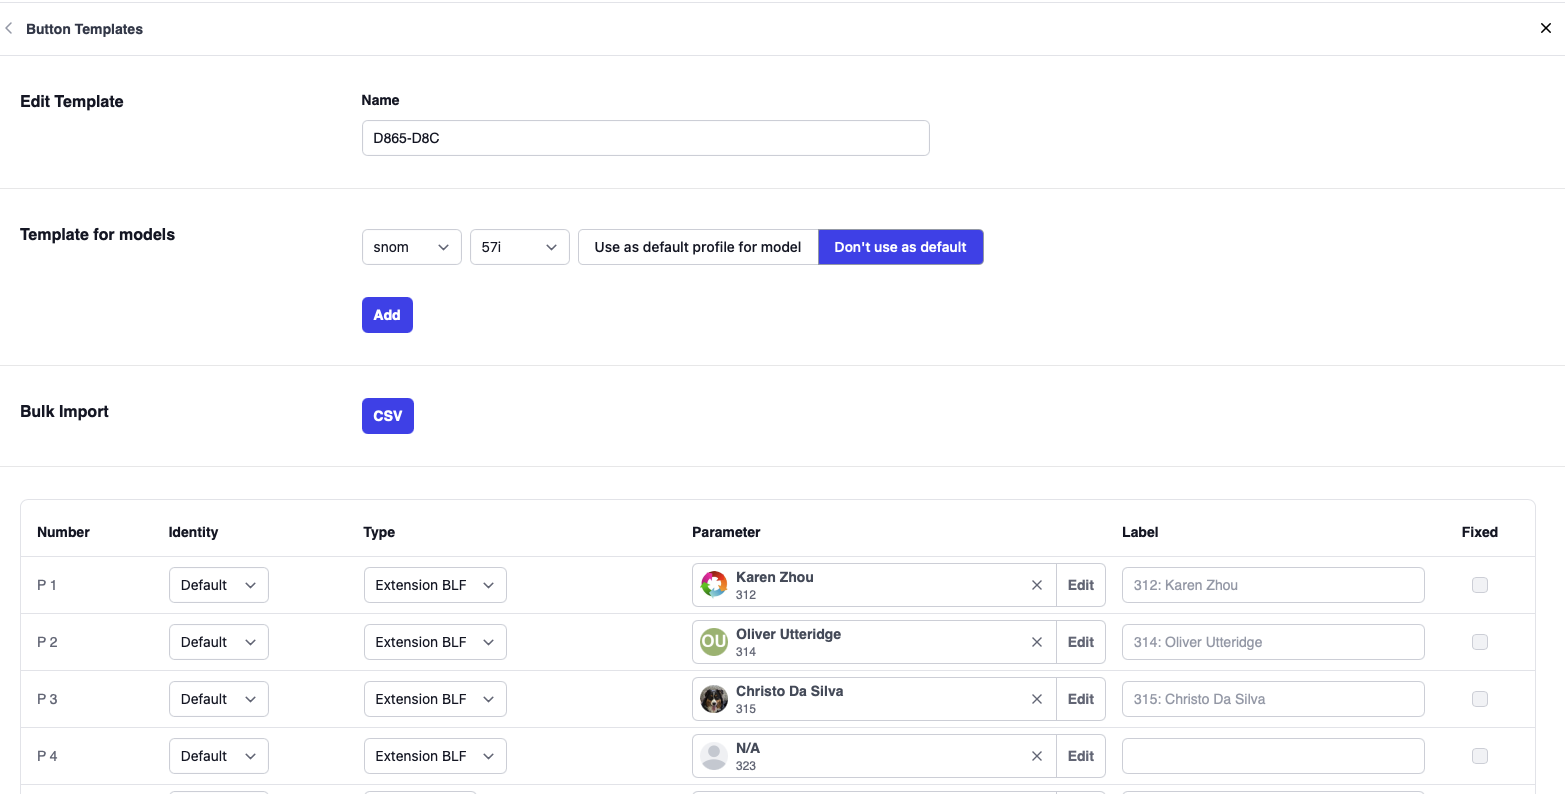
Button Profile
Button profiles can be use to define the button assignment for multiple devices. Profiles can be assigned explicity in the buttons tab for an extension, as a bulk operation in the extensions list or as a model default.
In order to create a profile, navigate to the buttons page inside the tenant. Button profiles can have arbitrary names.
When editing a profile, you can pick which models are used for the template. If you pick multiple devices, the system will merge the available buttons into the profile. This works well when there is a family of devices where all buttons have the same functionality.
You can also set the template as the default for the model. In this case, there is no need to explicitly assign the template to a profile.
Add and Map Buttons
Once you have created a profile, you can edit it to add or modify buttons. Each button has the following entry:
- Number: This field helps you assign the button to the phone itself or the expansion module. Each device has its own numbering scheme defined by the vendor (see below).
- Identity: This field defines what identity to use for the button, if there are multiple extensions assigned to the same device.
- Type: This field selects the functionality for the button (see below).
- Parameter: This field provides additional information depending on the type.
- Label: The labels are generated automatically when the parameter field has been entered. The value can explicitly be set in this field. The label us used only where phones use a display in front of their keys for labels or virtual keys.
- Fixed: This field when checked, doesn't allow the user to change the buttons from their end.
Button Numbers
Every device manufacturer comes up with their own names for the buttons. In most cases, it is obvious which buttons are available.
If there are many buttons, the PBX interface seperated the buttons into several groups for easier use.
Because extensions boards offer a large number of buttons that are typically not used by most devices, for those models seperate model names are used. When using these devices, the model must be explicitly assigned to the device.
Button Types
Following is a list and explanation of the button types. Not all modes are available on all models; the availabiltiy depends on the features that the device supports.
Not assigned: This mode just leaves the button unassigned.
Configure on phone: Many phones allow the user to program the button on the type. Typically, after pressing the button for a long time, a dialog appears that guides the user through the process of setting the button up.
Private line: Most VoIP phones place calls on private line buttons. In this mode, calls can be accepted, held and retrieved by pushing the button that was assigned to a call. The call appears only on that device, thus the name private.
Extension BLF: This mode shows when the specified extensions are in use. The corresponding LEDs are solid green when registered. When the extension is connected, the LED will be solid; when the extension is ringing, the LED will blink fast; and when the extension is holding a call, the light will blink slowly. When the LED is blinking, i.e. an extension is ringing, you can pick up the call by pressing the corresponding button but only if the phone model supports it and is configured correctly. When the user presses the button, the phone always dials the programmed extension.
Auto Attendant: This mode can be used to monitor activity on an auto attendant. Users can pick up calls by pressing the button (permission required).
Ring Group: This mode can be used to monitor calls in a ring group (see ring group for more details). When a call can be picked up, the light will blink.
Call Queue: This mode can be used to monitor calls in a call queue (see call queues for more details). When a call can be picked up, the light will blink.
Conference: This mode will show if there is any participant in the conference room. There is no pickup functionality for this mode.
Service Flag: This mode allows you to change the status of a service flag. See service flag for more details
Park Orbit: Use this mode if you want to assign a button to a park orbit. Once this button has been configured, calls can be parked and retrieved by pressing this button. A parked call is indicated by a blinking light.
IVR Node: This mode will show calls that are in the IVR node.
CO-Line: This mode will show calls that are assigned to the CO-line.
Paging: This mode will trigger a page. This can be unicast or multicast, depending on the page group setup and the support from the device.
Speed dial: When buttons are used as speed dials, the phone will simply dial the programmed number (the LED next to the button will not light up). Speed dials can be used for phone numbers, extensions, star codes, and other numbers.
Intercom: This button sets up the intercom functionality on the button which allows to call an extension with the push of the button and direct connection without waiting for pickup.
Voicemail: This button indicates when a message has arrived for the account that is entered into this field. The voicemail button can be especially useful in situations where it is necessary to monitor the mailbox of another extension, for example when using a mailbox in a group.
LDAP: This button will allow the user to open the address book through the LDAP protocol.
Do not disturb: This mode shows that extension’s DND status. The LED will light when DND is in active mode. The user can change the status by pushing the button.
Agent login/logout: This mode shows an agent’s login/logout status. This button can be used in a number of ways:
- If the agent needs to log in and out of all agent groups at the same time (or if the agent belongs to only one agent group), use a single Agent login/logout button and do not specify a parameter (leave it blank).
- If the agent belongs to numerous agent groups and needs to log in and out of a specific agent group before logging into another agent group, use multiple Agent login/logout buttons and in the parameter field, enter the agent group number. Do this for each agent group.
Once this button has been configured, the LED will light when the agent is logged in.
Redirect: This mode allows you to redirect calls to a predefined extension or number. To use this mode, enter the redirection target into the parameter field. Pressing the button activates redirection and lights the LED. Pressing the button deactivates redirection.
Pickup group: This will pick up a call from the pickup group.
Cell Phone: This mode allows you to pull a call from the users cell phone and push a call back to your cell phone, depending on where the call is. This requires that a cell phone number was assigned to the extension assigned to the device. This mode is not using the users app, it is using the SIP trunk instead.
URL: This mode will have the phone trigger a HTTP request to the provided URL. Depending on the phone, this might trigger additional actions when the result is available.
Transfer: The button will initiate a transfer. The exact functionality depends on the phone type.
Hold: The button will hold and retrieve the call. The exact functionality depends on the phone type.
Mute: The button will mute and unmute the call. The exact functionality depends on the phone type.
Redial: The button will dial the last number.
Record: The button will start and stop call recording. The exact functionality depends on the phone type.
Prefix This button prepares the prefix so that any other number or button pressed after that will be added to the prefix for an action on the Yealink phones. For example it could be a transfer star code etc.
DTMF: The button will send a DTMF sequence. This is done by the phone itself and the exact functionality depends on the phone type.
Grandstream: This mode can be used to program Grandstream devices. The parameter for the button has the form name=content, seperated by ;. There are two modes available:
type=x;account=y: The mode will put the type and the account into the P-values for the device.type=x;account=y;label=z;lock=l: The mode will put the information into a XML<item>used by the GRP and GHP models.
snom: This is a special mode that allows direct programming of snom buttons. It will put the content of the key parameter right into the XML for the button.
Yealink: This mode can be used to program Yealink devices. The parameter for the button has the form name=content, seperated by ;. Available names are value, pickup, type, phonebook.
VTech: This mode can be used to program VTech devices. The parameter for the button has the form name=content, seperated by ;. Available names are feature and the names used by the devices.
Avaya: This is a special mode that allows direct programming of Avaya J-series buttons. It will put the content of the key parameter right into the key parameter for the button.