Email Setup
Sending out emails is an important mechanism for the system to stay in touch with administrators and users. Emails can be used to set up welcome and password reset emails, they can be used to send voicemail messages, messages about missed calls and other status emails to extensions and send reports about the call queues and other accounts to managers.
The PBX has an email client that connects to email servers either through HTTPS or SMTP. Emails are generally stored in a table of the system, so that they don't get lost during reboot cycles until they have been sent out.
Email Setup
- Version 69
- Version 70
There are several ways to connect to an email server.
If you select Send emails through cloud server the system will just send emails from a email account provided by Vodia. This is a very simple way to set up email on the system. This obviously requires that emails are sent through Vodia-provided servers. If the setup requires that data does not go through such a server or you simply want to use your own email addresses, you need to comfigure the SMTP server as described on this page.
In any case you should provide the email address of the administrator in the Admin email addresses, so that the system can send important updates about the system to the administrator.
Configuring the SMTP Server
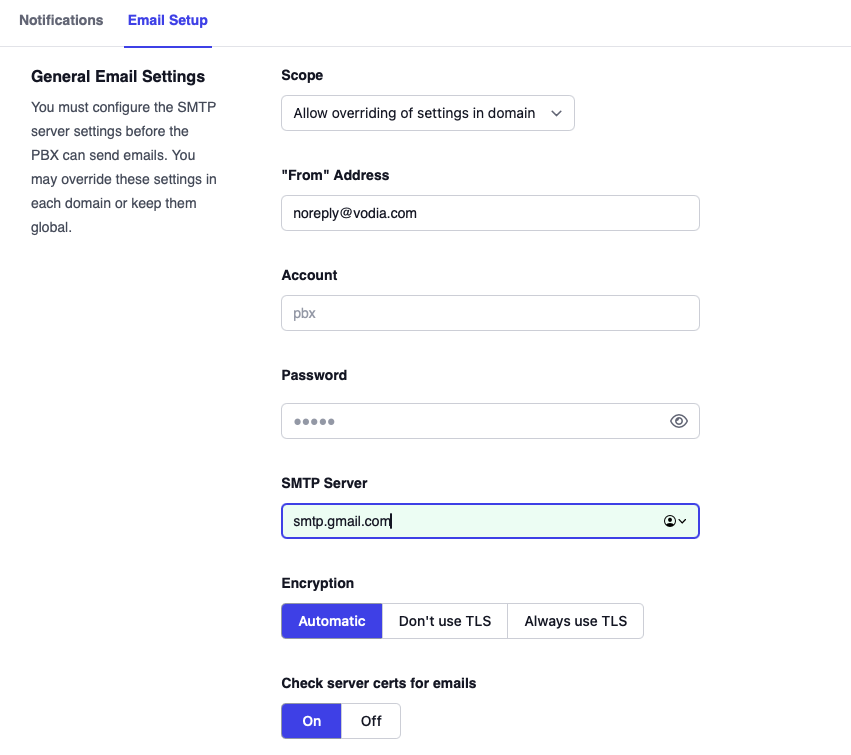
The Vodia PBX system can be configured as an email client to send email messages to the users. To do this, the system needs a mail or an SMTP server (via an external SMTP provider) to send the messages. If you already have an SMTP server set up, you can configure it to the system using the following instructions.
Note: SMTP settings can be configured from both the Admin and Domain levels of the system (i.e., each domain can override the system-level email settings). The settings within the tenant are a subset of the settings for the system administrator.
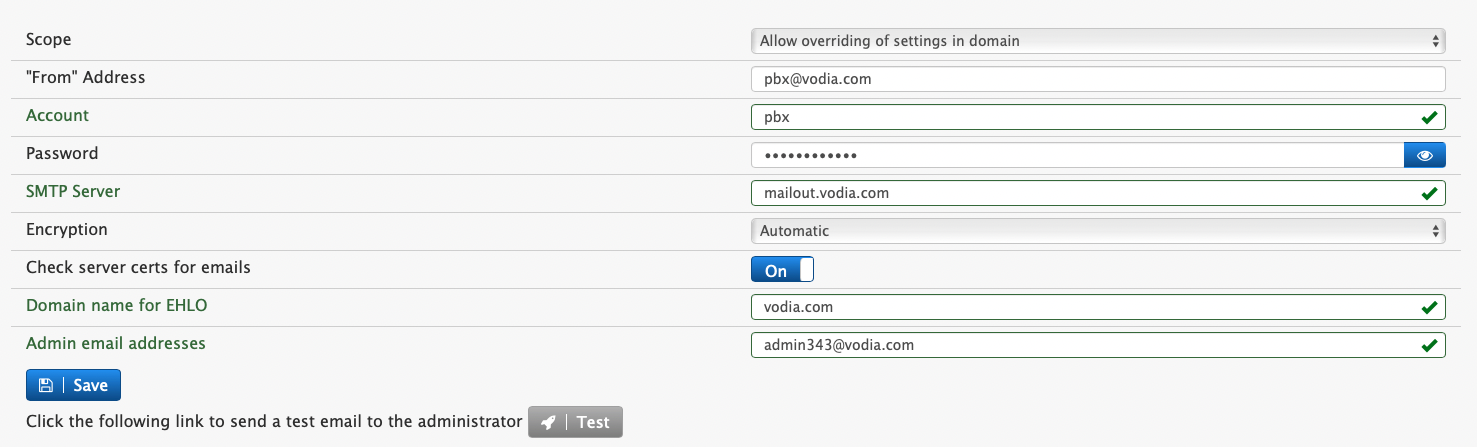
From Address: This field will be used by the system when it sends emails. You can use names like voicemail@your-company.com or pbxautomailer@your-company.com. The name will appear in the From field of the email, as shown above. Account: Provide the e-mail account for the SMTP server. Generally, this is the same as the From address. Password: This is the password for the e-mail account. Password(repeat): Confirmation for the password. SMTP Server: This is your SMTP outgoing mail server. The system can send email messages by emulating an email client; however, it needs a mail or SMTP server to send the messages. If you are using Gmail’s SMTP server (smtp.gmail.com), you will need to add a certificate . Encryption: This setting allows you to activate/deactivate TLS.
- Automatic: If the email server needs TLS, then the system will start TLS, otherwise, TLS will not be considered. Basically, there is a negotiation process before sending the email.
- Don’t Use TLS: If you know that your mail server does not support TLS, use this setting.
- Always Use: If your mail server requires TLS, then use this setting (Gmail requires TLS). Check server certs for emails: When using TLS, check if the server provides a valid certificate. This should be turned on in most cases, however there are servers that are unable to provide a valid certificate. Domain name for EHLO: Some servers check this name when connecting. Number of retries: When sending of an email fails, the PBX will retry sending the email. Admin email addresses: This is the email address or addresses of the system administrator account.
To test the setup, click on the Test button at the bottom of the page. There is a special log level for SMTP events that will help showing the problem if the test email fails.
Examples
Microsoft Office 365
- "From" Address: Theo Test <abc@vodia.com>
- Account: abc@vodia.com
- SMTP Server: smtp.office365.com:587
- Encryption: Automatic
- Check server certs for emails: Yes
- Domain name for EHLO: vodia.com
If you are using a PBX version 5.0.5 or lower, you will probably have to turn the certification checking off.
Gmail
Note: Google has deprecated the Less secure apps for Google Account that used the simple user and password method, instead you will need to provide a 16 digit code that is now used as the password in order to use the account on the PBX.
In order to use the account on the Vodia phone system you will need to activate your account for 2 step verification, once the account is activated with this feature, under your "Manage your Google Account"
-d7815534f952fec131cb4a6136b9a7ec.png)
then go back to your Google security center and choose "Security" choose 2-Step Verification "On" if it's already on then click on App password and create the type of App you will use, in this case the description is your phone system
-cb4077940c200d27b8717dd7845cf269.png)
You will then be presented with a prompt to enter the type of App is to be allowed on the account. Here you can put a description, then press the generated code
-8a150d5718ef2e0a67b6bf0ea58c9a52.png) Enter the 16 character code into your Vodia Password as shown below
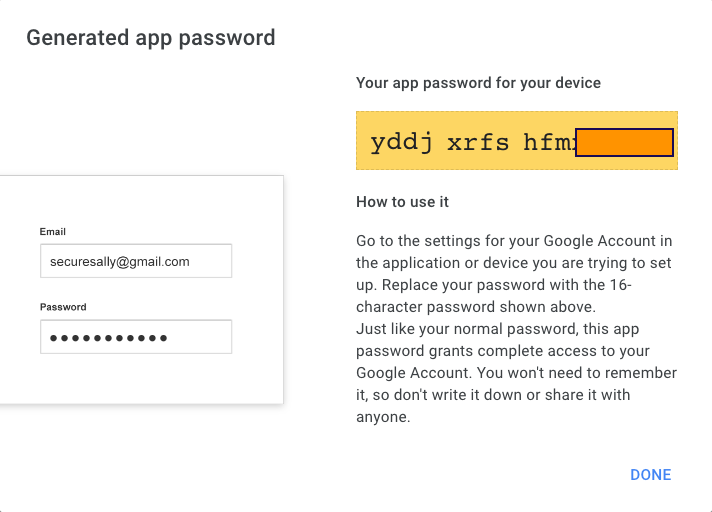
Enter the 16 character code into your Vodia Password as shown below

- "From" Address: Theo Test <ttest@gmail.com>
- Account: ttest@gmail.com
- Password: "ttest" account Gmail 16 character password
- SMTP Server: smtp.gmail.com:465
- Encryption: Always use TLS
- Check server certs for emails: Off
- Use same settings for all domains: On
- Domain name for EHLO: vodia.com
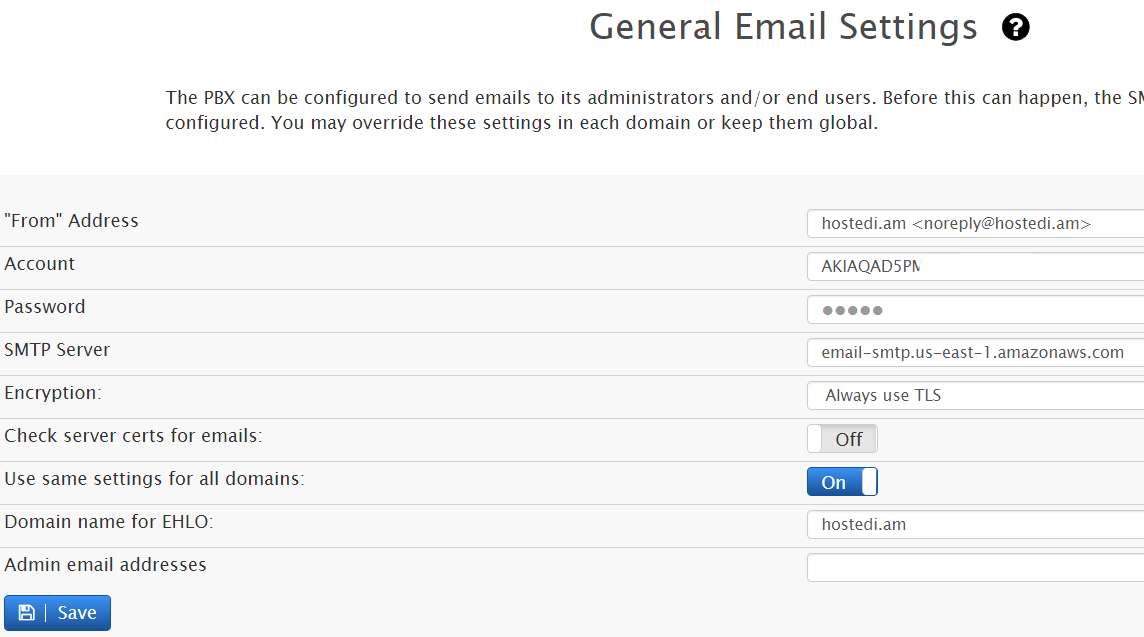
AWS SMTP server
- "From" address: Vodia <noreply@hostedi.am> (You can also enter your from address only)
- Account: AWS Account name (usually is an alphanumeric string)
- Password: AWS account password
- SMTP Server: email-smtp.us-region-number.amazonaws.com
- Encryption: Always use TLS
- Check server certs for emails: No
- Use same settings for all domains: Yes
- Domain Name for EHLO: vodia.com (your domain name)
- Admin Email addresses: abc@vodia.com; tat@vodia.com; bat@vodia.com
Call Reports
The system can generate email reports for most account types. Those emails are sent by email. The address field can contain one or more email addresses (seperated by semicolon).
The time for sending the report defines the time or the times when reports are sent out and what duration is reported. By default reports will be sent at midnight in the time zone for the account for the last day. However the system can send out reports for different time intervals at different times. Multiple times can be selected. The format is time/day. The time field specifies the time of day when the report is being sent. The day can be one of the following values:
mon-sunormonday-sundayfor weekly reports on a specific day (the text is always English).dayfor daily reports.weekfor weekly reports, sent out on Sunday.monthfor monthly reports, sent out on the first day of a month for the last month.quarterfor quarter reports, sent out on the first day of a quarter for the last quarter.
There are several report formats available:
- The system can generate graphical charts that contain pie and bar charts with information about the calls. This format is only available for call queues and ring groups.
- When choosing embedded HTML the system will include the call list in the email text.
- When choosing HTML or text attachment, the system will include the call list in an attachment.