Tenant Management
The Vodia PBX uses the notion of a tenant to describe a group of users that are able to distribute and transfer calls within that group, see the status of other users, reassign mailbox messages and generally collaborate on voice calls. They can also access the same address book and share features, such as call monitoring and call park/pickup. Tenants are generally not aware of the presence of other tenents on the same PBX instance.
Tenants have a DNS address under which those users typically register their phones and log into their web front-end. A tenant on the Vodia PBX is similar to an email tenant. Typically one company has one tenant on the Vodia PBX.
Each tenant has one or more names. One name is the primary name which is used when the PBX wants to represent the tenant. The other names are alias names that serve when the PBX needs to match incoming requests to a tenant on the system. The DNS name localhost has a special meaning in the PBX; it matches any incoming name, so that the PBX can accept for example traffic that is directed at the IP address of the PBX.
The Vodia PBX telephone system generally supports multiple tenants on each instance, even if the license was issued only for one tenant. By default, the PBX creates a tenant with the DNS name localhost. This tenant can be renamed or deleted if there is no need to match incoming request to a tenant that would otherwise not be mapped to a tenant.
Creating a Tenant
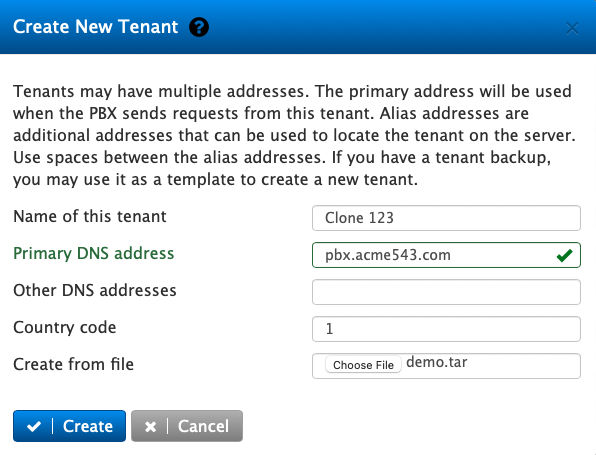
In the admin mode, click on List to show the list of tenants on your PBX, as well as the section to create a new tenant as shown.
- Version 69
- Version 70
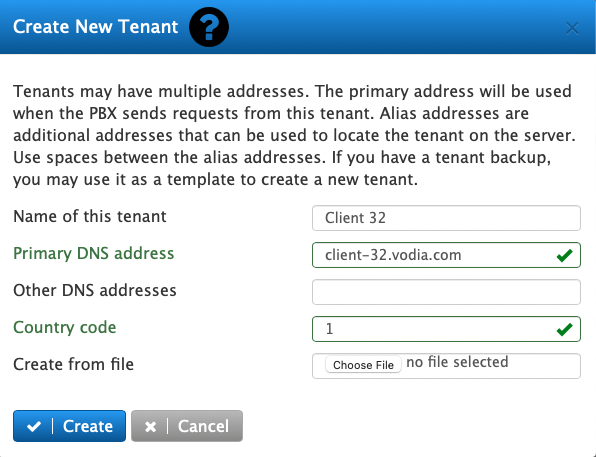
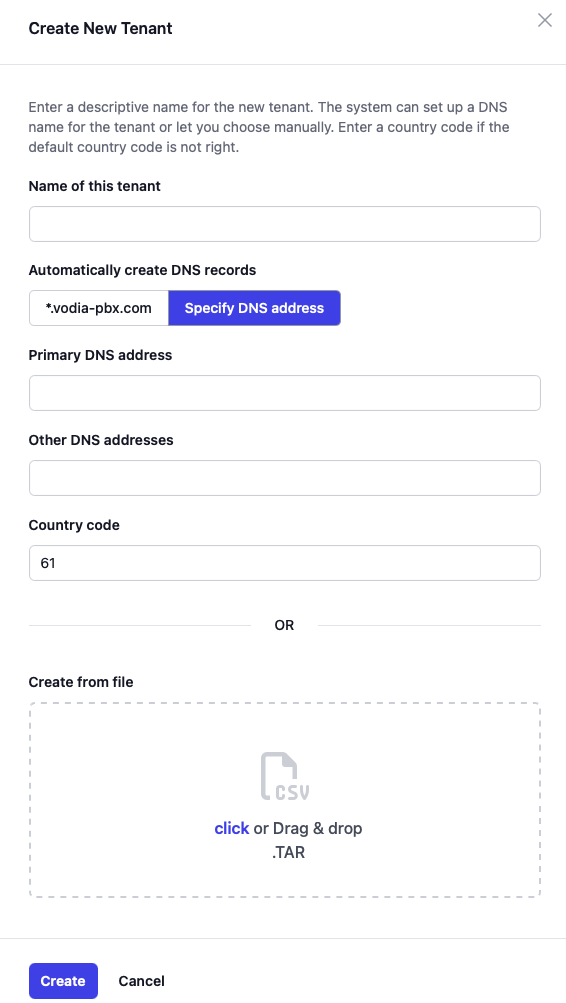
- Tenants should have a descriptive name. The Name of this tenant can be any text, including spaces and UTF-8 characters. Typically is has 10-40 characters so that the formatting will work well across sites.
- Tenants may have multiple DNS addresses. The Primary DNS address will be used when the PBX sends requests from this tenant.
- Other DNS addresses are additional addresses that can be used to locate the tenant on the server. Use spaces between the alias names.
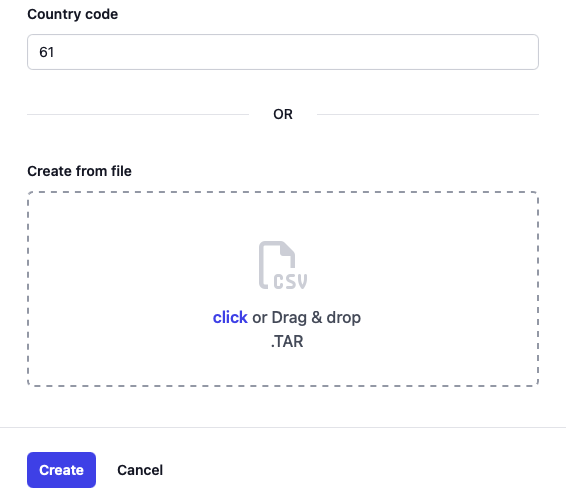
- You should use a Country code to tell the system what context to use for phone numbers.
- If you have a backup for a tenant as a .tar file, you may use it in the Create from file as a template to create the new tenant.
- Press Create to create the new tenant.
It will appear in the list of tenants above, which you can click to enter.
Editing a tenant
There are two ways to edit the content of a tenant. The first method is to switch into the tenant context and edit the accounts, address book and all the other information in tenant mode. This is done by clicking on the tenant name in the tenant view web page.
Certain settings can only be edited by the system administrator. Those settings include the name for the tenant, the DNS addresses, and also other billing-related settings, the maximum number of accounts that can be set up in the tenant, certain flags for example for voicemail transcription. In order to edit those features of the tenant, click on the edit button in the tenant row.
Name of this tenant: This field takes a name for the tenant. The name can contain any character, including spaces.
Primary DNS address: This address is the DNS name the system will use when representing the tenant, for example when generating provisioning information for VoIP phones.
Other DNS addresses: Each tenant can have additional alias names. Those names will be direct incoming requests to the tenant; however the address will not be used by the PBX to represent the tenant.
Country Code: The country code is important for interpreting phone numbers. 1 is used for USA and Canada, 49 for Germany and so on.
Restrict numbers for calls: This setting controls what phone numbers a tenant can use as ANI for outbound calls.
Plan: Use a specific plan for the tenant, see monthly billing.
Maximum number of accounts: Using these settings, the number of specific accounts is restricted for this tenant.
Maximum number of calls: When this field is set, the number of calls is restricted for this tenant. This includes internal calls.
Maximum number of calls on trunks: This field restricts the number of calls that can have a trunk involved.
Threshold for sending trunk call notifications: This number is used to trigger emails to the administrator when a certain number of calls has been reached in the tenant.
Maximum call duration: This setting overrides the global setting for the maximum call duration.
Available only to super administrator: When this flag is enabled, this tenant is visible only to the super administrator.
Enable voicemail to text API: When this flag is enabled, the voicemail to text API is enabled for the tenant.
Google speech to text API key: This setting overrides the global API key for this tenant.
Enable caller-ID lookup: When this flag is set, the system will try the caller-ID lookup for this tenant.
Enable text messaging: This field controls the availability for text messaging.
Enable call recording: This flag controls if call recording is available for the tenant.
Duration for keeping CDR: This field controls how long CDR are kept for this tenant. When empty, the system setting is used.
Duration for keeping recordings: This field controls how long recordings are kept for this tenant. When empty, the system setting is used.
Duration for keep activity logs: This field controls how long activity logs are kept for this tenant. When empty, the system setting is used.
Mask the last digits in tenant CDR: When enabled, the system will mask the last digits in CDR.
Max. number of concurrent registrations per extension: This setting controls how many registrations are allowed on this tenant, unless set on extension level.
Billing parameter 1-3: These parameters are used for billing.
Deleting a tenant
In order to delete a tenant, click on the delete button. The system will prompt for a confirmation of this action and then remove all information stored inside that tenant from the system.
Tenant backup
The system administrator can download a .tar image of a tenant from the web interface of the system. This backup can be used to restore the tenant, but it can also be used to create a new tenant (use it as a template). This backup is hard to generate from the file system because of the structure of the data in the file system (in order to backup the whole system, it is easier to just copy the working directory of the PBX).
The tentant backup does not contain information that is on system level. This could be for example the preferred transport layer for SIP or the default country code for the system. Also when restoring tenants that contain phone numbers that have a system scope (DID, ANI), global trunks or dial plans, or MAC addresses, they cannot be restored if they are already present on the system.
When generting a tenant backup, the size of the resulting file might exceed the limits set for the system. If that is the case, navigate to (Administrator → General → System and scroll down to Performance and increase the size fo the configuration backup file to a size that would be able to store your tenant data.
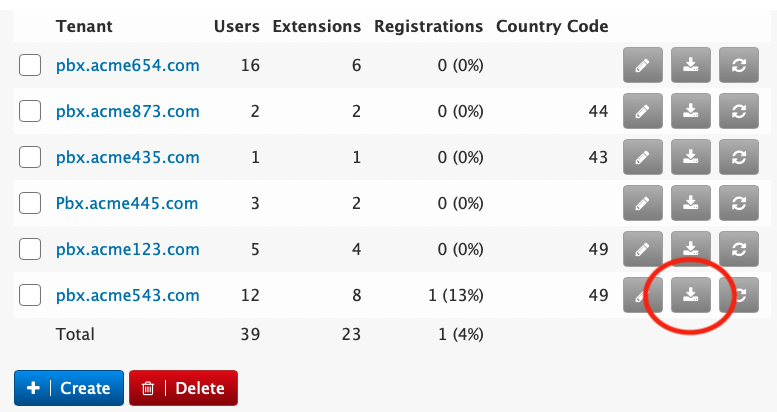
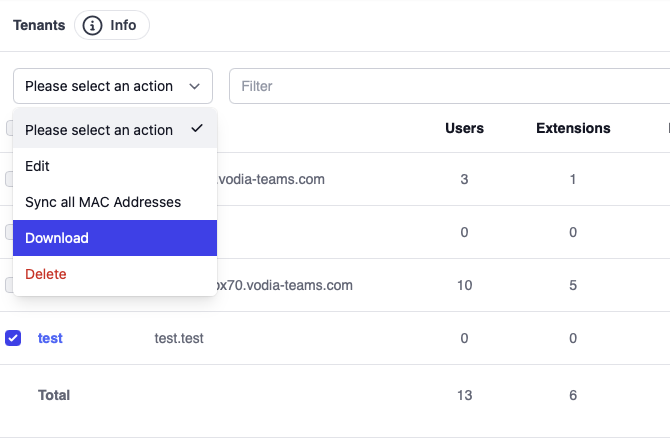
In order to perform a tenant backup, there is a download button in the row for the tenant. Clicking on that button will trigger a download of the tenant configuration data in .tar format. In newer versions, select the tenant and click the download button.
- Version 69
- Version 70
Restore your tenant
To restore a tenant, navigate to Tenants → List and click on Create. In addition to the parameter for setting up an empty tenant, you need to select the backup file.
- Version 69
- Version 70
Synchronize tenant settings
When you click on the synchronize button next to the download button, the system will attempt to synchronize the MAC addresses in that tenant with the redirection server for the phone vendors (if set up). It will also attempt to issue the ACME certificate for the DNS names of that tenant.