Certificate Management
The PBX uses TLS in secure communication, e.g. for HTTP and SIP traffic. This works only if the system has a pair of private keys and certificates. Depending on the direction of the communication, it needs to either present a certificate (e.g. web server) or trust certificates from other parties (e.g. when the PBX pulls information from other sites).
Clients like web browsers and VoIP phones typically use the server name indication (SNI) extension in the TLS protocol to tell the PBX which tenant they want to connect to. This is why each tenant has a list of DNS names (DNS stands for domain name system). If such an indication is available, the PBX will first search a matching domain certificate. If there is no domain certificate available, the PBX uses the system certificate as the default. System certificates can be wildcard certificates, and they can contain multiple names as well like most certificates do.
When the PBX acts as a client and connects to other services, it uses the list of Root CA to check if the connection can be trusted.
Root CA
When you visit the certificate page, the system lists the certificates that have been loaded into the system.
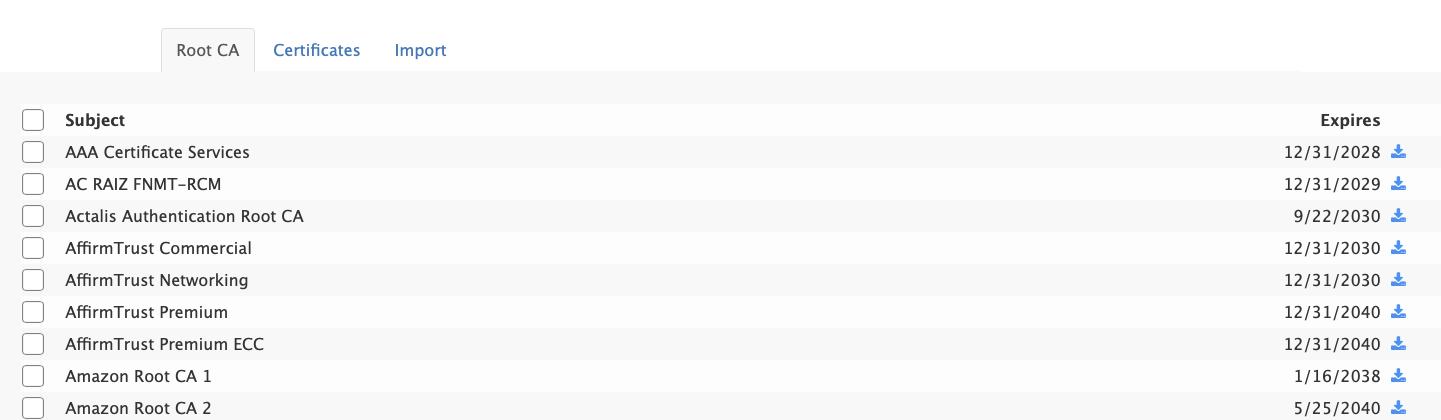
If you don't want to use certain certificates, you can select them from the list and then click on the delete button. To view a certificate, click on the icon next to the certificate. It will download the certificate.
If you want to update the list of trusted Root CA (e.g. because you are using a newer PBX version), you can use the reset button on the page.
Software upgrades before version 69.3.2 don't automatically update the list of root RA. Use the Reset button to update the list of Root CA.
Issued Certificates
You can see what certificates have been issued or uploaded in the certificates tab. By clicking on the certificate icon you can view the certificate, and by clicking on the delete button you can remove the certificate from the system. By clicking on the reissue button you can trigger a renewal of the certificate even if it is not up for renewal yet.
If you are using the HTTP verification method, make sure that port 80 is open to receive requests when you attempt to reissue a certificate.
Importing Certificates
The list of Root CA and the list of available certificates can manually be updated with the certificate import. When updating the list of Root CA there is no need to include the private key (which is typically not available anyway) and there is also no need to include the certificate chain.
When importing a certificate that the PBX should use in a server context, certificates typically consist of a chain of certificates. While there is no need to include the Root CA, the PBX needs the intermediate CA during the import process.
Many certificate vendors will provide you with a .crt which is the domain name, and also a .ca-bundle which typically will have the intermediate certificate. To enter your wild card certificate you must add the .crt followed by the .ca-bundle in the same box then enter your private key on the secondary box labeled "private key". Leaving out the intermediate will work with many browsers, however it will cause problems with Android versions.
The format of the certificate must be base64-encoded ----BEGIN CERTIFICATE---- and end with the text ----END CERTIFICATE----. When importing a certificate chain, you must put the certificate to be imported first, followed by zero, one or more intermediate certificates that the server should present later. Those intermediate certificates also go into the certificate import text area.
If you are uploading a domain or server certificate, you must include the private key in the upload. The private key must also be base64-encoded and start with ----BEGIN RSA PRIVATE KEY---- (PKCS#1) or ----BEGIN PRIVATE KEY---- (PKCS#8). Private keys must not be password protected as the PBX has no way to decrypt that during start-up.
Domain certificates must match exactly the DNS name which is used for the tenant on the PBX. The PBX automatically assigns the certificate to the matching tenant. Wildcard certificates must be imported as server certificates, as they serve all tenants on the system.
Wildcard certificates should be imported as server certificate, so that any tenant on the system that matches the wildcard can use this certificate.
Example for when you have one certificate to be added to the server
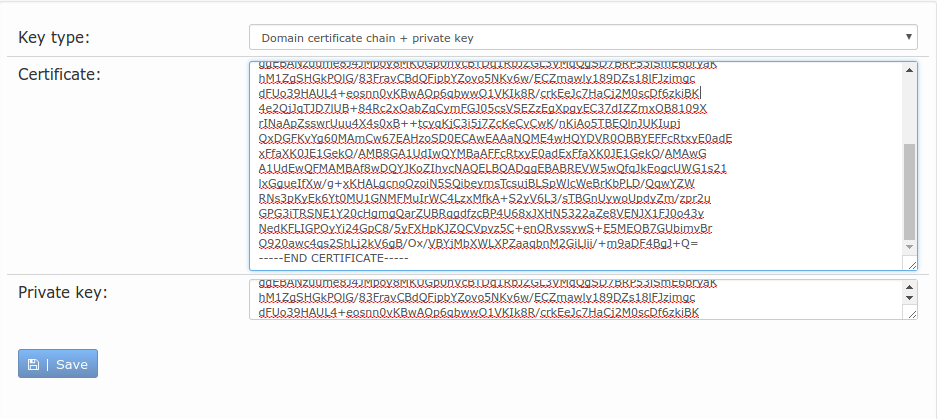
Example for when you have two or more certificates to be added to the server. Let's say you have your wild card certificate and an intermediate certificate e.g. GoDaddy, then both get added in the Certificate area box as shown.

When you upload a STIR/SHAKEN certificate, you need to set the Identity header in the trunk that is supposed to use the certificate to use STIR/SHAKEN. It will automatically choose a STIR/SHAKEN certificate that matches one of the tenant DNS names, or if that can not be found, the first STIR/SHAKEN that is available on the system.
If you just want to update a certificate, leave the private key area empty (available after version 69.3.1) and proceed like you would import a certificate. The updated certificate must use the private key of the certificate that it replaces.
Getting a Valid Certificate
There are several ways to obtain a certificate for a tenant or the system. Typically you can just use the LetsEncrypt service through the ACME protocol, but you can also buy certificates or create your own.
ACME Protocol
LetsEncrypt (https://letsencrypt.org) uses the ACME protocol and offers free certificates through its certification service. There are two ways to use this service:
-
If your DNS provider is listed on the PBX and you have entered the credentials for managing DNS records, the PBX will take care about the DNS challenge method supported by LetsEncrypt. This works with public IP addresses, but it also works with private IP addresses.
-
Otherwise, the LetsEncrypt service will try to send a challenge to the HTTP port of the PBX. That means that the PBX must have port 80 open for HTTP for the LetsEnctry robot. The name of DNS entry must be identical to a tenant DNS address or the system management DNS address with the DNS A or DNS AAAA record set accordingly.
The PBX will check every 24 hours if certificates need to be renewed. This typically happens early enough to suppress the certificate expiry warning from LetsEncrypt. The emai laddress used for issuing the certificate is the address of the system administrator, or info@vodia.com if that address was not set.
LetsEncrypt has rate limits for issuing certificates. If you are using many certificates, you might have to look into alternative ACME providers. You also have to make sure that the LetsEncrypt bot can access port 80 of the PBX from anywhere in the internet, including international addresses.
Buying a Certificate
When you buy a certificate, it must be known that you are really the one who is operating a server. Although the mechanisms for this process differ, all services require that you pay for the service and that your web browser is already set up to trust the certificate authority. This mechanism is suitable if you are operating a public service where it is not an option to load root certificates on many clients. You usually also need to specify which IP addresses are using this certificate for the service.
Manual update of certificates
In scenarios where you cannot upgrade the PBX, and certificates are failing to renew due to Let's Encrypt's implementation of TLS 1.3, you can use this script to manually update the certificates. We still recommend upgrading your PBX and using this script only as a last resort.