Jitsi Meet Video Conference Integration
This integration connects your Vodia PBX with a self-hosted Jitsi Meet server, enabling one-click video conferencing directly from the web portal. Conferences are secured with JWT authentication — moderators receive a signed token while guests join via a shared link. Room names are generated automatically using the extension number and a random hash to prevent unauthorized access.
Enhance your experience by using this integration with our web portal features.
How It Works
- A user right-clicks an extension in the web portal and selects Video Conference (Jitsi)
- The PBX backend generates a JWT-authenticated moderator URL and an unauthenticated guest URL
- The moderator's browser opens the Jitsi conference room automatically
- The invited user receives a notification with the guest link to join the room
- When all participants leave, the Jitsi room is automatically destroyed (rooms are ephemeral)
Requirements
Jitsi Meet Server
- Ubuntu 24.04 LTS server (dedicated or virtual)
- DNS A record pointing to the server's public IP
- Firewall ports open: 80/TCP, 443/TCP, 10000/UDP
- Minimum 2 CPU cores and 4 GB RAM recommended
Vodia PBX
- Vodia PBX with integration plugin support
- Admin access to the tenant settings
Part 1: Jitsi Meet Server Setup
This section walks through installing Jitsi Meet with JWT authentication on a fresh Ubuntu 24.04 server. The example uses meet.example.com — replace this with your actual domain throughout.
Step 1 — Prepare the Server
Set the hostname and update the system:
sudo hostnamectl set-hostname meet.example.com
echo "127.0.0.1 meet.example.com" | sudo tee -a /etc/hosts
sudo apt update && sudo apt upgrade -y
Step 2 — Install Dependencies
Install the required packages for Jitsi and JWT authentication:
sudo apt install -y apt-transport-https curl gnupg2 lua5.4 liblua5.4-dev libssl-dev luarocks
Set Lua 5.4 as the default version (required by Prosody):
sudo update-alternatives --install /usr/bin/lua lua-interpreter /usr/bin/lua5.4 100
sudo update-alternatives --set lua-interpreter /usr/bin/lua5.4
sudo update-alternatives --install /usr/bin/luac lua-compiler /usr/bin/luac5.4 100
sudo update-alternatives --set lua-compiler /usr/bin/luac5.4
Do not remove lua5.1 — it breaks the alternatives system. Setting lua5.4 as preferred is sufficient.
Verify with lua -v — it should show Lua 5.4.x.
Step 3 — Add Package Repositories
Add the Prosody repository:
curl -fsSL https://prosody.im/files/prosody-debian-packages.key | sudo gpg --dearmor -o /etc/apt/keyrings/prosody-keyring.gpg
echo "deb [signed-by=/etc/apt/keyrings/prosody-keyring.gpg] http://packages.prosody.im/debian $(lsb_release -sc) main" | sudo tee /etc/apt/sources.list.d/prosody.list
If you get a GPG key error during apt update, the Prosody key may have changed. Try fetching it from a keyserver instead:
sudo gpg --keyserver hkps://keyserver.ubuntu.com --recv-keys F7A37EB33D0B25D7
sudo gpg --export F7A37EB33D0B25D7 | sudo tee /etc/apt/keyrings/prosody-keyring.gpg > /dev/null
Add the Jitsi repository:
curl -sL https://download.jitsi.org/jitsi-key.gpg.key | sudo gpg --dearmor -o /usr/share/keyrings/jitsi-keyring.gpg
echo "deb [signed-by=/usr/share/keyrings/jitsi-keyring.gpg] https://download.jitsi.org stable/" | sudo tee /etc/apt/sources.list.d/jitsi-stable.list
Step 4 — Install Jitsi Meet
sudo apt update
sudo apt install -y jitsi-meet
When prompted during installation:
- Hostname: Enter your domain (e.g.,
meet.example.com) - SSL certificate: Select "Let's Encrypt certificates" and enter your email address
If dpkg errors occur (e.g., Lua version issues), run sudo dpkg --configure -a and retry.
Verify Prosody is running:
sudo systemctl status prosody
At this point, open https://meet.example.com in your browser to confirm Jitsi is working with open access (no authentication yet).
Step 5 — Install JWT Dependencies
sudo luarocks --lua-version=5.4 install luajwtjitsi
sudo luarocks --lua-version=5.4 install inspect
Step 6 — Generate a JWT Secret
Generate a secure secret and save it — you will need it for both the Prosody config and the Vodia PBX integration settings:
openssl rand -hex 32
Example output: 0b9780402cc144544e74ab27e0700f3b051dbb691907668b5807af5244e61b2f
Step 7 — Configure Prosody for JWT Authentication
Back up the original config:
sudo cp /etc/prosody/conf.avail/meet.example.com.cfg.lua /etc/prosody/conf.avail/meet.example.com.cfg.lua.bak
Edit the Prosody configuration:
sudo nano /etc/prosody/conf.avail/meet.example.com.cfg.lua
Make the following changes to the file:
Main VirtualHost — change authentication to token and add JWT settings:
VirtualHost "meet.example.com"
    authentication = "token"
    app_id = "vodia"
    app_secret = "YOUR_SECRET_FROM_STEP_6"
    allow_empty_token = false
MUC component — add restrict_room_creation to prevent unauthenticated room creation:
Component "conference.meet.example.com" "muc"
    restrict_room_creation = true
Do not add token_verification to the MUC modules_enabled list. This would block anonymous guests from joining existing rooms.
Guest VirtualHost — add this at the end of the file to allow anonymous guest access:
VirtualHost "guest.meet.example.com"
    authentication = "anonymous"
    c2s_require_encryption = false
See the Full Prosody Configuration section at the end of this page for a complete reference file.
Step 8 — Configure Jitsi Meet for Guest Access
Edit the Jitsi Meet JavaScript configuration:
sudo nano /etc/jitsi/meet/meet.example.com-config.js
Find the hosts: block and add the anonymousdomain line:
hosts: {
    domain: 'meet.example.com',
    anonymousdomain: 'guest.meet.example.com',
    // ... other settings
}
Optionally, disable the welcome page to prevent users from creating random rooms:
enableWelcomePage: false,
Step 9 — Configure Jicofo for Authentication
Edit the Jicofo configuration:
sudo nano /etc/jitsi/jicofo/jicofo.conf
Set the authentication block and ensure the focus user password is configured:
jicofo {
  authentication: {
    enabled = true
    type = XMPP
    login-url = "meet.example.com"
  }
  xmpp: {
    client: {
      client-proxy: "focus.meet.example.com"
      xmpp-domain: "meet.example.com"
      domain: "auth.meet.example.com"
      username: "focus"
      password: "YOUR_JICOFO_PASSWORD"
    }
    trusted-domains: [ "recorder.meet.example.com" ]
  }
  bridge: {
    brewery-jid: "JvbBrewery@internal.auth.meet.example.com"
  }
}
Choose a secure password for YOUR_JICOFO_PASSWORD — you will register it with Prosody in the next step.
Step 10 — Restart Services and Register Users
Restart all services:
sudo systemctl restart prosody
sudo systemctl restart jicofo
sudo systemctl restart jitsi-videobridge2
Register the Jicofo focus user in Prosody with the same password you set in jicofo.conf:
sudo prosodyctl register focus auth.meet.example.com YOUR_JICOFO_PASSWORD
If Jicofo shows SASLError using SCRAM-SHA-1: not-authorized in the logs, the focus user password is out of sync. Re-run the prosodyctl register command above and restart Jicofo.
Verify Jicofo connects successfully:
sudo tail -20 /var/log/jitsi/jicofo.log
Step 11 — Test the Installation
Test 1: Unauthenticated access is blocked
Open https://meet.example.com in your browser. You should see a disconnection error — this confirms JWT is required.
Test 2: Authenticated moderator access Generate a test JWT token:
sudo apt install -y python3-jwt
python3 -c "
import jwt, time
payload = {
    'aud': 'jitsi',
    'iss': 'vodia',
    'sub': 'meet.example.com',
    'room': '*',
    'exp': int(time.time()) + 3600,
    'context': {'user': {'name': 'Test User', 'email': 'test@example.com', 'moderator': True}}
}
print(jwt.encode(payload, 'YOUR_SECRET_FROM_STEP_6', algorithm='HS256'))
"
Open https://meet.example.com/testroom?jwt=TOKEN — you should join as moderator.
Test 3: Guest access
While the moderator is in the room, open https://meet.example.com/testroom in another browser. The guest should join without any credentials.
Part 2: Vodia PBX Configuration
Once the Jitsi server is running, configure the integration in Vodia PBX.
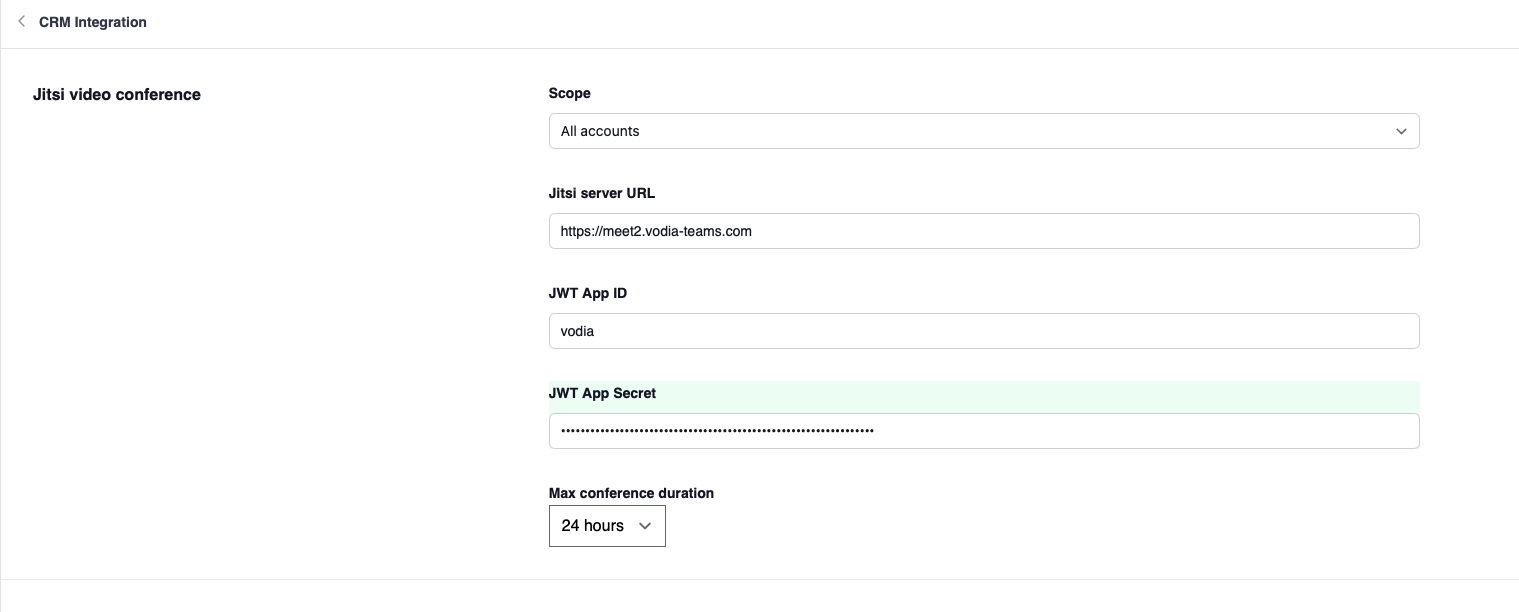
Integration Setup
- In the Tenant settings, navigate to Advanced → CRM Integration
- Select Jitsi and configure the following:
- Jitsi Server URL: The full URL of your Jitsi server (e.g.,
https://meet.example.com) - JWT App ID: The
app_idfrom your Prosody config (e.g.,vodia) - JWT App Secret: The secret generated in Step 6
- Max Conference Duration: Maximum allowed conference time (1 to 24 hours)
- Jitsi Server URL: The full URL of your Jitsi server (e.g.,
- Save the settings
Part 3: Using Video Conferences
Once configured, users will see the Jitsi video conference option in the web portal.
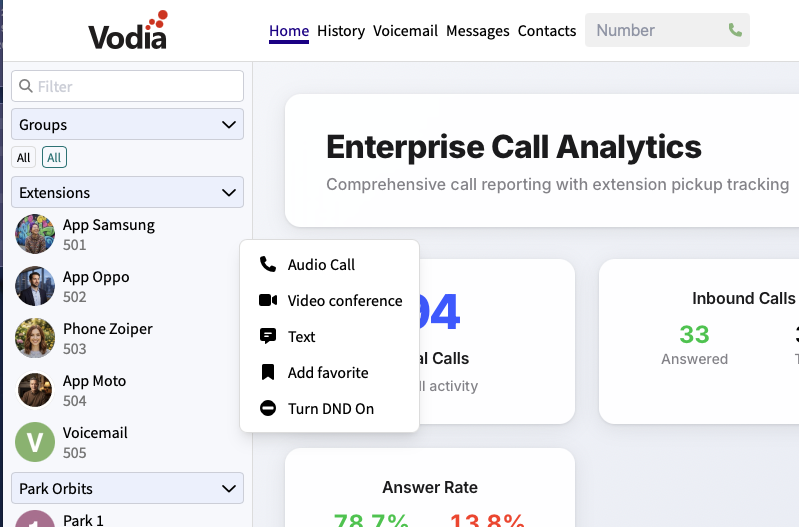
Starting a Conference
- In the web portal, right-click on an extension in the BLF / contacts panel
- Select Video Conference (Jitsi) from the popup menu
- A new browser window opens with the Jitsi conference room (you join as moderator)
- The invited user receives a browser notification with a link to join
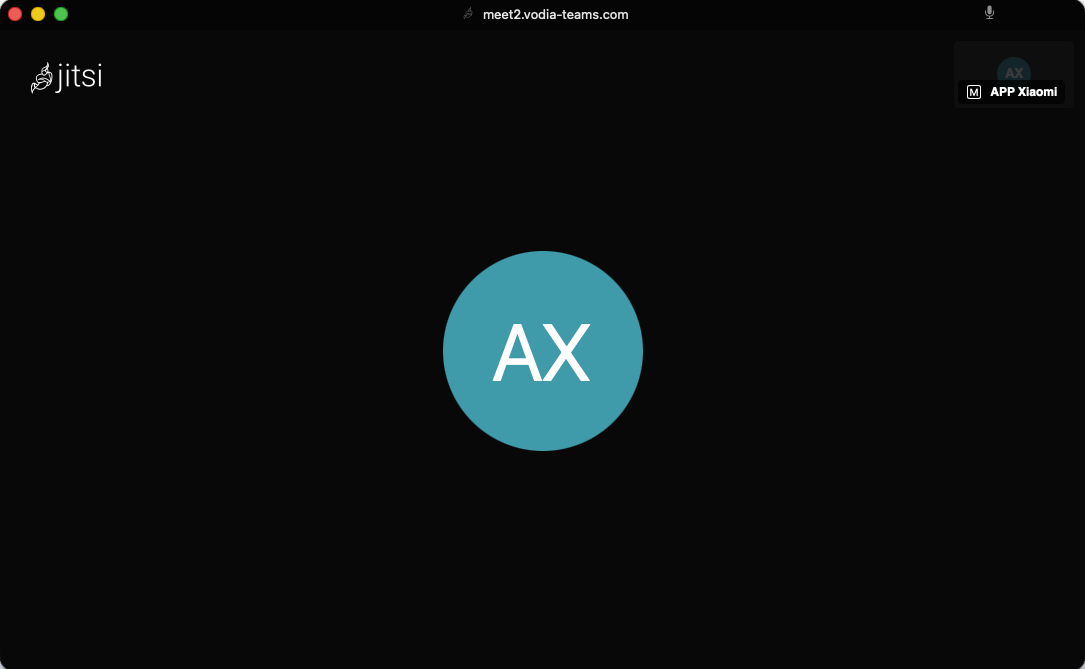
Joining a Conference
When invited to a Jitsi conference:
- A browser notification appears with the caller's name
- Click the notification to open the conference room in a new window
- Guests join without needing any credentials
Inviting Additional Participants
While a conference is active, right-click on another extension and select Video Conference (Jitsi) again. The new participant will receive an invitation to the same room. You also have the option of inviting external guests.
Security Model
The integration uses a layered security approach:
- JWT authentication: Moderators receive a signed JWT token with a configurable expiry time. The token includes the user's name, email, and moderator status.
- Room name randomization: Room names are generated as
extension-randomhash(e.g.,500-a3f9b2c8e1d4), making rooms unguessable. - Restricted room creation: Only JWT-authenticated users can create new rooms. Guests can only join rooms that already exist.
- Ephemeral rooms: Jitsi rooms automatically destroy themselves when the last participant leaves — no cleanup required.
Full Prosody Configuration
Below is a complete reference Prosody configuration file. Replace meet.example.com with your domain and YOUR_SECRET_HERE with your JWT secret from Step 6.
component_admins_as_room_owners = true

plugin_paths = { "/usr/share/jitsi-meet/prosody-plugins/" }

muc_mapper_domain_base = "meet.example.com";

external_service_secret = "GENERATE_A_RANDOM_SECRET";
external_services = {
     { type = "stun", host = "meet.example.com", port = 3478 },
     { type = "turn", host = "meet.example.com", port = 3478, transport = "udp", secret = true, ttl = 86400, algorithm = "turn" },
     { type = "turns", host = "meet.example.com", port = 5349, transport = "tcp", secret = true, ttl = 86400, algorithm = "turn" }
};

cross_domain_bosh = false;
consider_bosh_secure = true;
consider_websocket_secure = true;

ssl = {
    protocol = "tlsv1_2+";
    ciphers = "ECDHE-ECDSA-AES128-GCM-SHA256:ECDHE-RSA-AES128-GCM-SHA256:ECDHE-ECDSA-AES256-GCM-SHA384:ECDHE-RSA-AES256-GCM-SHA384:ECDHE-ECDSA-CHACHA20-POLY1305:ECDHE-RSA-CHACHA20-POLY1305:DHE-RSA-AES128-GCM-SHA256:DHE-RSA-AES256-GCM-SHA384"
}

unlimited_jids = {
    "focus@auth.meet.example.com",
    "jvb@auth.meet.example.com"
}

smacks_max_unacked_stanzas = 5;
smacks_hibernation_time = 60;
smacks_max_old_sessions = 1;

VirtualHost "meet.example.com"
    authentication = "token"
    app_id = "vodia"
    app_secret = "YOUR_SECRET_HERE"
    allow_empty_token = false
    ssl = {
        key = "/etc/prosody/certs/meet.example.com.key";
        certificate = "/etc/prosody/certs/meet.example.com.crt";
    }
    modules_enabled = {
        "bosh";
        "websocket";
        "smacks";
        "presence_identity";
        "ping";
        "external_services";
        "features_identity";
        "conference_duration";
        "muc_lobby_rooms";
        "muc_breakout_rooms";
    }
    c2s_require_encryption = false
    lobby_muc = "lobby.meet.example.com"
    breakout_rooms_muc = "breakout.meet.example.com"
    main_muc = "conference.meet.example.com"

Component "conference.meet.example.com" "muc"
    restrict_room_creation = true
    storage = "memory"
    modules_enabled = {
        "muc_hide_all";
        "muc_meeting_id";
        "muc_domain_mapper";
        "muc_rate_limit";
        "muc_password_whitelist";
    }
    admins = { "focus@auth.meet.example.com" }
    muc_password_whitelist = {
        "focus@auth.meet.example.com"
    }
    muc_room_locking = false
    muc_room_default_public_jids = true

Component "breakout.meet.example.com" "muc"
    restrict_room_creation = true
    storage = "memory"
    modules_enabled = {
        "muc_hide_all";
        "muc_meeting_id";
        "muc_domain_mapper";
        "muc_rate_limit";
    }
    admins = { "focus@auth.meet.example.com" }
    muc_room_locking = false
    muc_room_default_public_jids = true

Component "internal.auth.meet.example.com" "muc"
    storage = "memory"
    modules_enabled = {
        "muc_hide_all";
        "ping";
    }
    admins = { "focus@auth.meet.example.com", "jvb@auth.meet.example.com" }
    muc_room_locking = false
    muc_room_default_public_jids = true

VirtualHost "auth.meet.example.com"
    ssl = {
        key = "/etc/prosody/certs/auth.meet.example.com.key";
        certificate = "/etc/prosody/certs/auth.meet.example.com.crt";
    }
    modules_enabled = {
        "limits_exception";
        "smacks";
    }
    authentication = "internal_hashed"
    smacks_hibernation_time = 15;

VirtualHost "recorder.meet.example.com"
    modules_enabled = {
      "smacks";
    }
    authentication = "internal_hashed"
    smacks_max_old_sessions = 2000;

Component "focus.meet.example.com" "client_proxy"
    target_address = "focus@auth.meet.example.com"

Component "speakerstats.meet.example.com" "speakerstats_component"
    muc_component = "conference.meet.example.com"

Component "endconference.meet.example.com" "end_conference"
    muc_component = "conference.meet.example.com"

Component "avmoderation.meet.example.com" "av_moderation_component"
    muc_component = "conference.meet.example.com"

Component "filesharing.meet.example.com" "filesharing_component"
    muc_component = "conference.meet.example.com"

Component "lobby.meet.example.com" "muc"
    storage = "memory"
    restrict_room_creation = true
    muc_room_locking = false
    muc_room_default_public_jids = true
    modules_enabled = {
        "muc_hide_all";
        "muc_rate_limit";
    }

Component "metadata.meet.example.com" "room_metadata_component"
    muc_component = "conference.meet.example.com"
    breakout_rooms_component = "breakout.meet.example.com"

Component "polls.meet.example.com" "polls_component"

VirtualHost "guest.meet.example.com"
    authentication = "anonymous"
    c2s_require_encryption = false