Vodia Android App
There are two Android versions available for the Vodia PBX. For version 69 and above, it is recommended to use the newer Vodia Phone 2.
Vodia Phone 2
This phone softphone uses the native Android SDK. It works better with Bluetooth devices and uses the Android call interface to manage calls, e.g. incoming calls.
Link to download the App: https://play.google.com/store/apps/details?id=com.vodia.vodiaconnect
In order to use the App, the user needs a 2D barcode that contains the username, domain, address of the PBX and a token which is linked to the users password for the account. The barcode can be obtained in several ways:
-
In the domain view in the administrator web interface. Under the provisioning tab, there is a button called QR-Code which creates a pop-up with the code. If the user is in front of the screen, the camera can take a photo of the screen for pairing.
-
The same is possible from the user portal. The code is available from the user menu, which will show up after clicking on the user icon on the top right corner of the interface.
-
The administrator can generate a page that contains the codes for multiple domains. In order to do that, switch into the domain administrator view and select "Download QR codes" in the list of extensions. This pages is intended for print out, so that the paper can be given to the user.
-
The PBX can also send an email with the code to the user. However this method must be enabled first in the system security settings (Settings → Security → General), the name of the setting is "Include 2D barcode in user welcome email". Then in the domain list of extensions select the item "send welcome email to selected accounts".
Using the App
Users can receive calls just like calls from other sources. For making calls, the user can use the dial button at the bottom right of the home tab inside the app. Users can also use the address book to dial a number; in that case the user has to select the Phone System service for outbound calls for that address book entry. You can also just use the dialpad to enter a number.
When a new call comes in, the user has the choice of replacing the current call, putting the current call on hold or rejecting the call. If the call comes in from the PBX, the user can hear a beep sound in the current conversation. After putting calls on hold, the user can resume those calls from the hold screen using the resume button at the bottom of the screen.
In order to turn DND on or off, the user can click on the symbol/picture at the top right of the app. This will open the settings where do-not-disturb can be toggled.
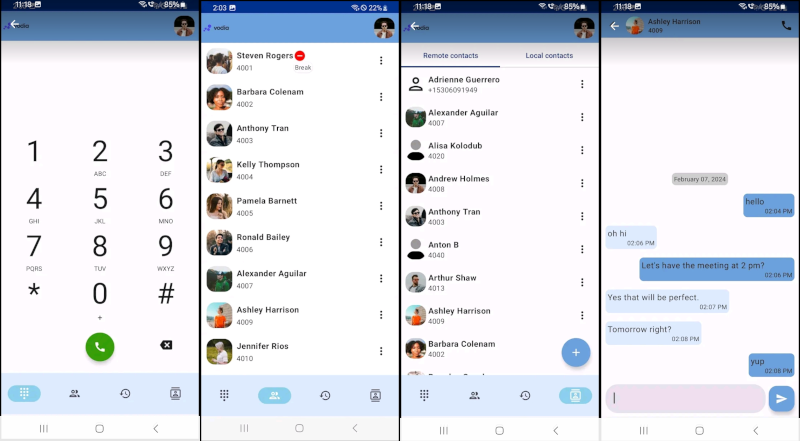
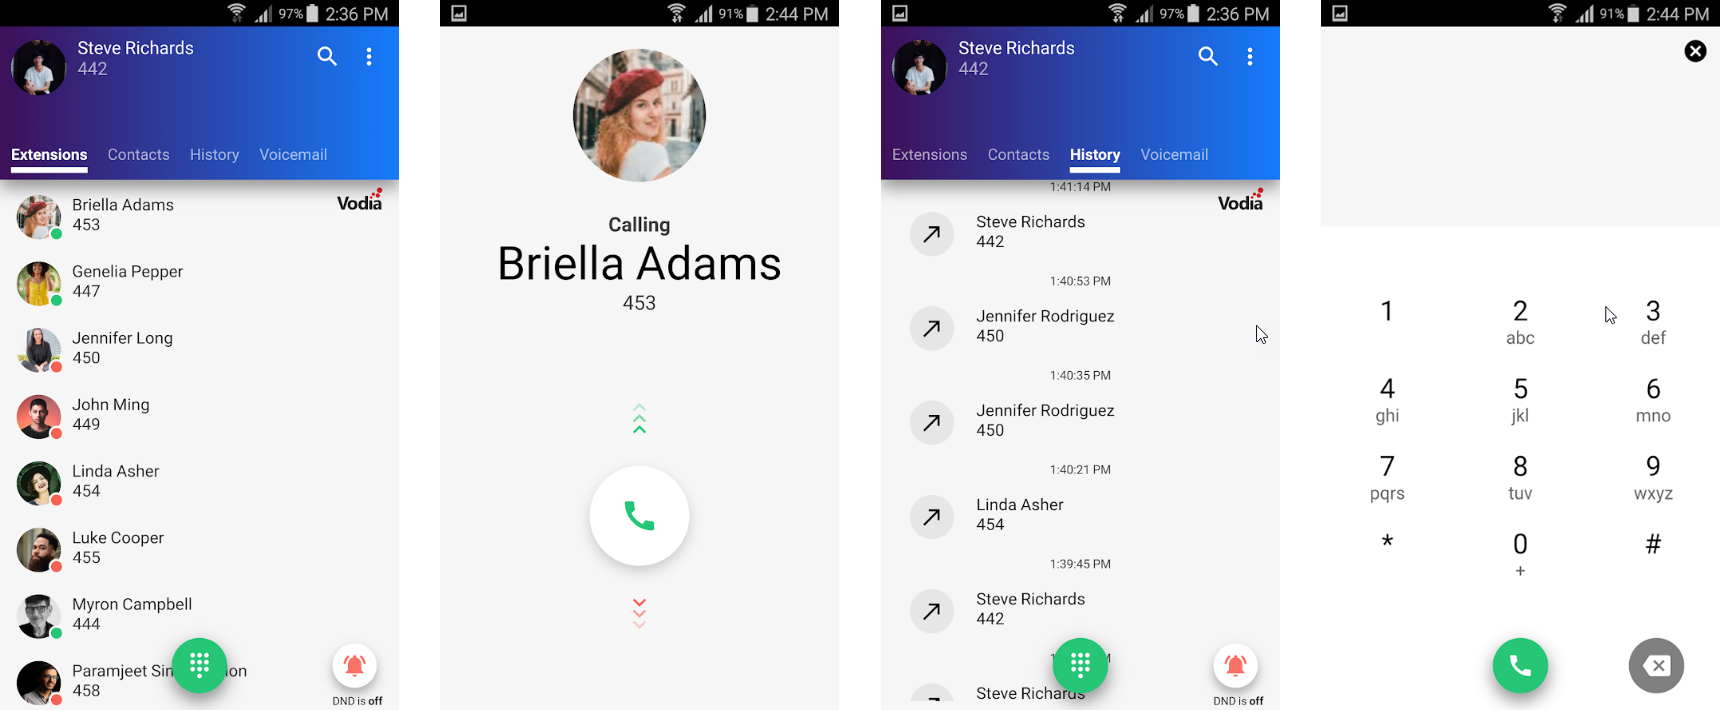
Home Tab
In the home tab, you can see the status of the other extensions in the domain. When pictures are loaded, the app will show them on the left side for each extension. There is a small circle below the image that shows if the extension is available (green), on do-not-disturb (red) or unavailable (grey). If the extension is in a call, there will be a red rectangle on the right side.
If you click on an extension, it will start a call to that extension. You need to confirm the call before the app starts to dial.
At the button there is a dial pad symbol that can be used to open the dialog for manually entering a phone number. If there are calls on hold, the home screen will show a resume button. Clicking on it will prompt for the call to resume.
History Tab
The history shows the calls for the extension, sorted by date. Inbound calls use an arrow from the top right to the bottom left (away from the number shown), and outbound calls show an arrow in the other direction. If a call was missed, the arrow is in red. The user can swipe the entry away, which will delete it from the personal call history, but not from the domain call history. Clicking on an entry will trigger the dialing of the number. This must be confirmed by the user. If not confirmed, missed calls will be marked as read and will show up in regular color.
Voicemail Tab
The voicemail tab shows the voicemail messages for the user. To play back an entry, the user needs to click on the playback button on the left side of the entry. Clicking again will stop the playback. By clicking on the entry the user can call the number back, which must be confirmed. Swiping the entry will delete the voicemail.
Messages Tab
In the messages tab users can send and receive text messages and see their chat history.
Address Book Tab
In the address book tab users can switch between Remote Contacts (pbx addresses) and Local Contacts (phone). When clicking on an entry, the user can decide what to do with the entry:
- The user can dial one of the numbers associated with the entry.
- The user can send a text message to the entry.
Below you can see a few screenshots of the new Phone2 App:
Vodia Phone
The previous version for the Vodia PBX is still available. It should not be used for new installations any more.
Link to download the App: https://play.google.com/store/apps/details?id=com.vodia.vodiaphone&hl=en_US
Battery optimization
After downloading the app please follow the following steps:
Kindly note that the app needs to be given permission for "Do not optimize the battery" on your Android 9 cell phone. Steps to do that:
- Long press on the App.
- Select "App info"
- Select "Battery"
- Select "Optimize battery usage"
- Select "All" to find Vodia's App in the list and 'Un-select' it so that it doesn't optimize it.
P.S: Without this setting, if you're in a call via Bluetooth, the audio is lost after 6 minutes, once the screen shuts off during the call.