Vodia PBX Failover Setup guide (rsync based example)
Overview
This guide provides step-by-step instructions for configuring automatic failover between two Vodia PBX servers using rsync for file replication. This setup ensures business continuity by automatically switching to a secondary server when the primary becomes unavailable.
Architecture
Primary Server:
- IP Address:
170.64.177.251 - Domain:
web.pbx70.vodia-teams.com - OS: Ubuntu 25.10
Secondary Server:
- IP Address:
170.64.166.2 - Domain:
web2.pbx70.vodia-teams.com - OS: Ubuntu 25.10
System DNS Address:
web.pbx70.vodia-teams.com(points to active server)web2.pbx70.vodia-teams.com(points to standby server)
Prerequisites
Before beginning the setup, ensure the following requirements are met:
Storage Requirements
Verify that your secondary server has adequate storage space to accommodate the full PBX working directory. Ideally, the secondary server should be in a remote location or different data center.
Domain Configuration Best Practices
1. Use Domain Names Over IP Addresses
- Configure DID routing using FQDNs rather than IP addresses
- Applies to both IP gateway trunks and SIP Proxy trunks
- Ensure phone configurations use domain names, not IP addresses (reference documentation)
2. DNS Structure If hosting multiple domains on a single server:
- Create one A record for the master domain
- Use CNAME records for all other domains pointing to the master domain
- Example:
web.pbx70.vodia-teams.com    A    170.64.177.251
domain1.vodia-teams.com      CNAME web.pbx70.vodia-teams.com
domain2.vodia-teams.com      CNAME web.pbx70.vodia-teams.com
3. DNS Failover Strategy Configure automated DNS changes during failover events:
- Use a script or automation playbook triggered by the PBX Action URL
- Consider cloud-based DNS services with health checking (e.g., AWS Route53)
- Health checks should typically target SIP port 5060
4. Firewall Considerations If whitelisting the PBX IP on customer firewalls:
- Use the PBX DNS name instead of IP addresses
- This allows failover without requiring firewall rule changes
Setup Instructions
Step 1: Install PBX on Secondary Server
Install the Vodia PBX software on the secondary server (170.64.166.2) following standard installation procedures for your operating system.
Step 2: Configure SSH Key Authentication
On the secondary server, generate SSH keys for passwordless authentication:
ssh-keygen -t ed25519 -C "cd@vodia.de"
Display the public key:
cat /root/.ssh/id_ed25519.pub
Copy the entire public key output, then on the primary server, add it to the authorized keys file:
# On primary server (170.64.177.251)
nano /root/.ssh/authorized_keys
# Paste the public key from secondary server
# Save and exit
Step 3: Configure rsync Replication
On the secondary server, configure rsync to replicate the PBX working directory while excluding the failover configuration file:
rsync -avz --exclude 'pbxctrl-failover.xml' --delete root@170.64.177.251:/usr/local/pbx/ /usr/local/pbx/
Command Breakdown:
-a: Archive mode (preserves permissions, timestamps, etc.)-v: Verbose output-z: Compress data during transfer--exclude 'pbxctrl-failover.xml': Prevents overwriting failover configuration--delete: Removes files on destination that don't exist on source
Run this command manually for the initial synchronization to verify it works correctly.
Step 4: Automate rsync with Cron
Schedule nightly synchronization by adding a cron job on the secondary server:
crontab -e
Add the following line to run rsync every night at 2 AM:
0 2 * * * rsync -avz --exclude 'pbxctrl-failover.xml' --delete root@170.64.177.251:/usr/local/pbx/ /usr/local/pbx/
This will synchronize files.
Step 5: Initial Secondary Server Configuration
After the first rsync completes, restart the PBX service on the secondary:
systemctl restart pbx
Temporarily point the system DNS to the secondary server for configuration. On your local machine (e.g., Mac), edit the hosts file:
# On your local machine
sudo nano /etc/hosts

# Add this line:
170.64.166.2 web.pbx70.vodia-teams.com
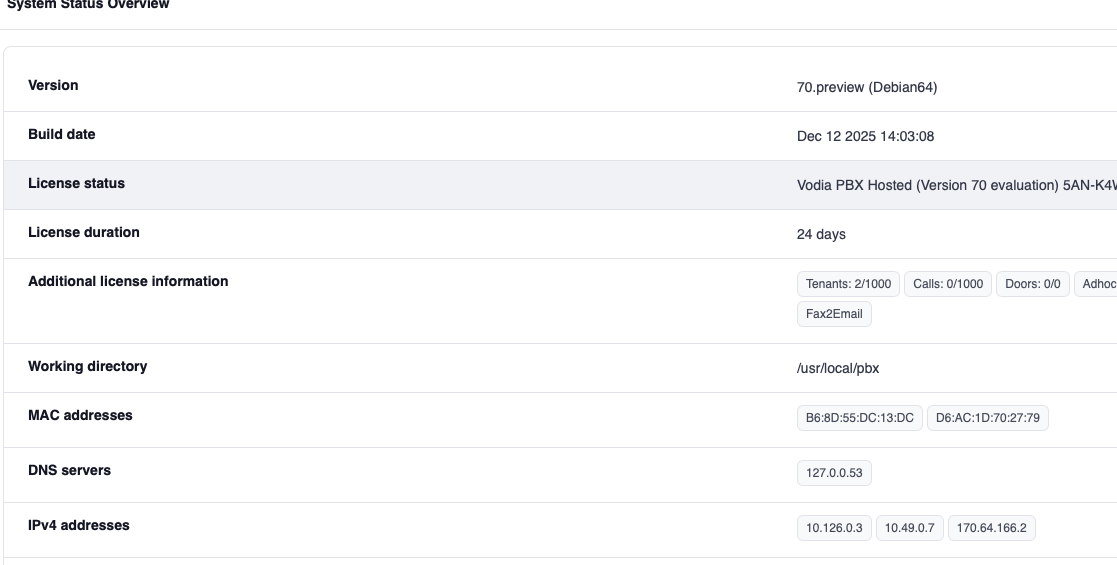
Step 6: Verify Secondary Server Status
Log into the secondary PBX web interface and navigate to Admin → Status.
Verify the IPv4 addresses shown include the secondary IP:
IPv4 addresses: 10.126.0.3, 10.49.0.7, 170.64.166.2
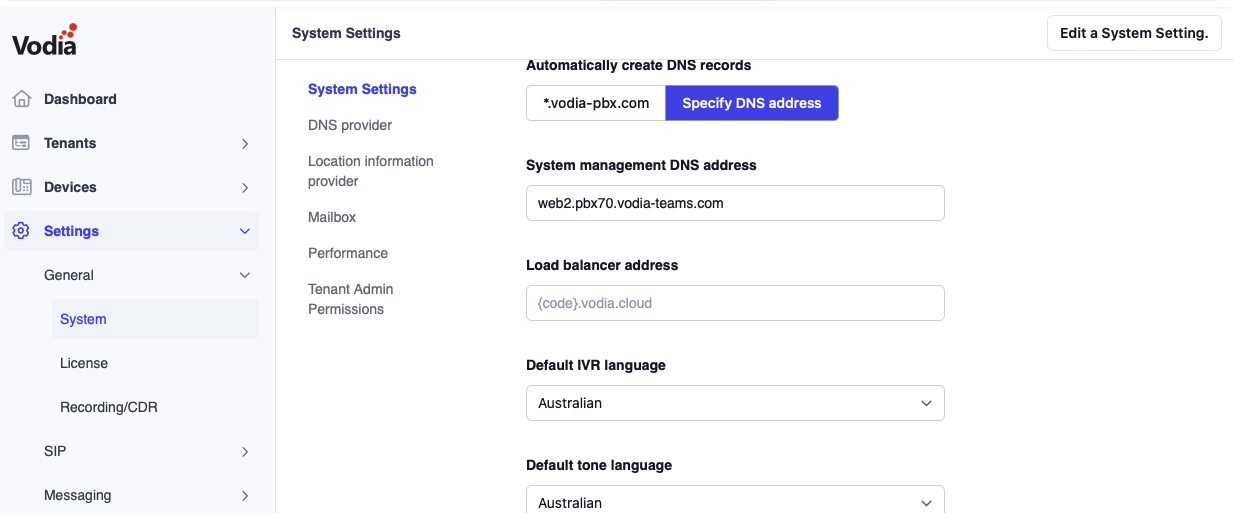
Step 7: Configure System DNS Address
In the secondary PBX web interface:
- Navigate to System settings
- Set the System management DNS Address to:
web2.pbx70.vodia-teams.com - Save the configuration
Important: Undo the local DNS override you created earlier:
# On your local machine
sudo nano /etc/hosts
# Remove or comment out the line for web.pbx70.vodia-teams.com
Even when files are synced from the primary, the system DNS address on the secondary remains web2.pbx70.vodia-teams.com and won't be overwritten. You can now use web.pbx70.vodia-teams.com to access the primary server and web2.pbx70.vodia-teams.com to access the secondary server.
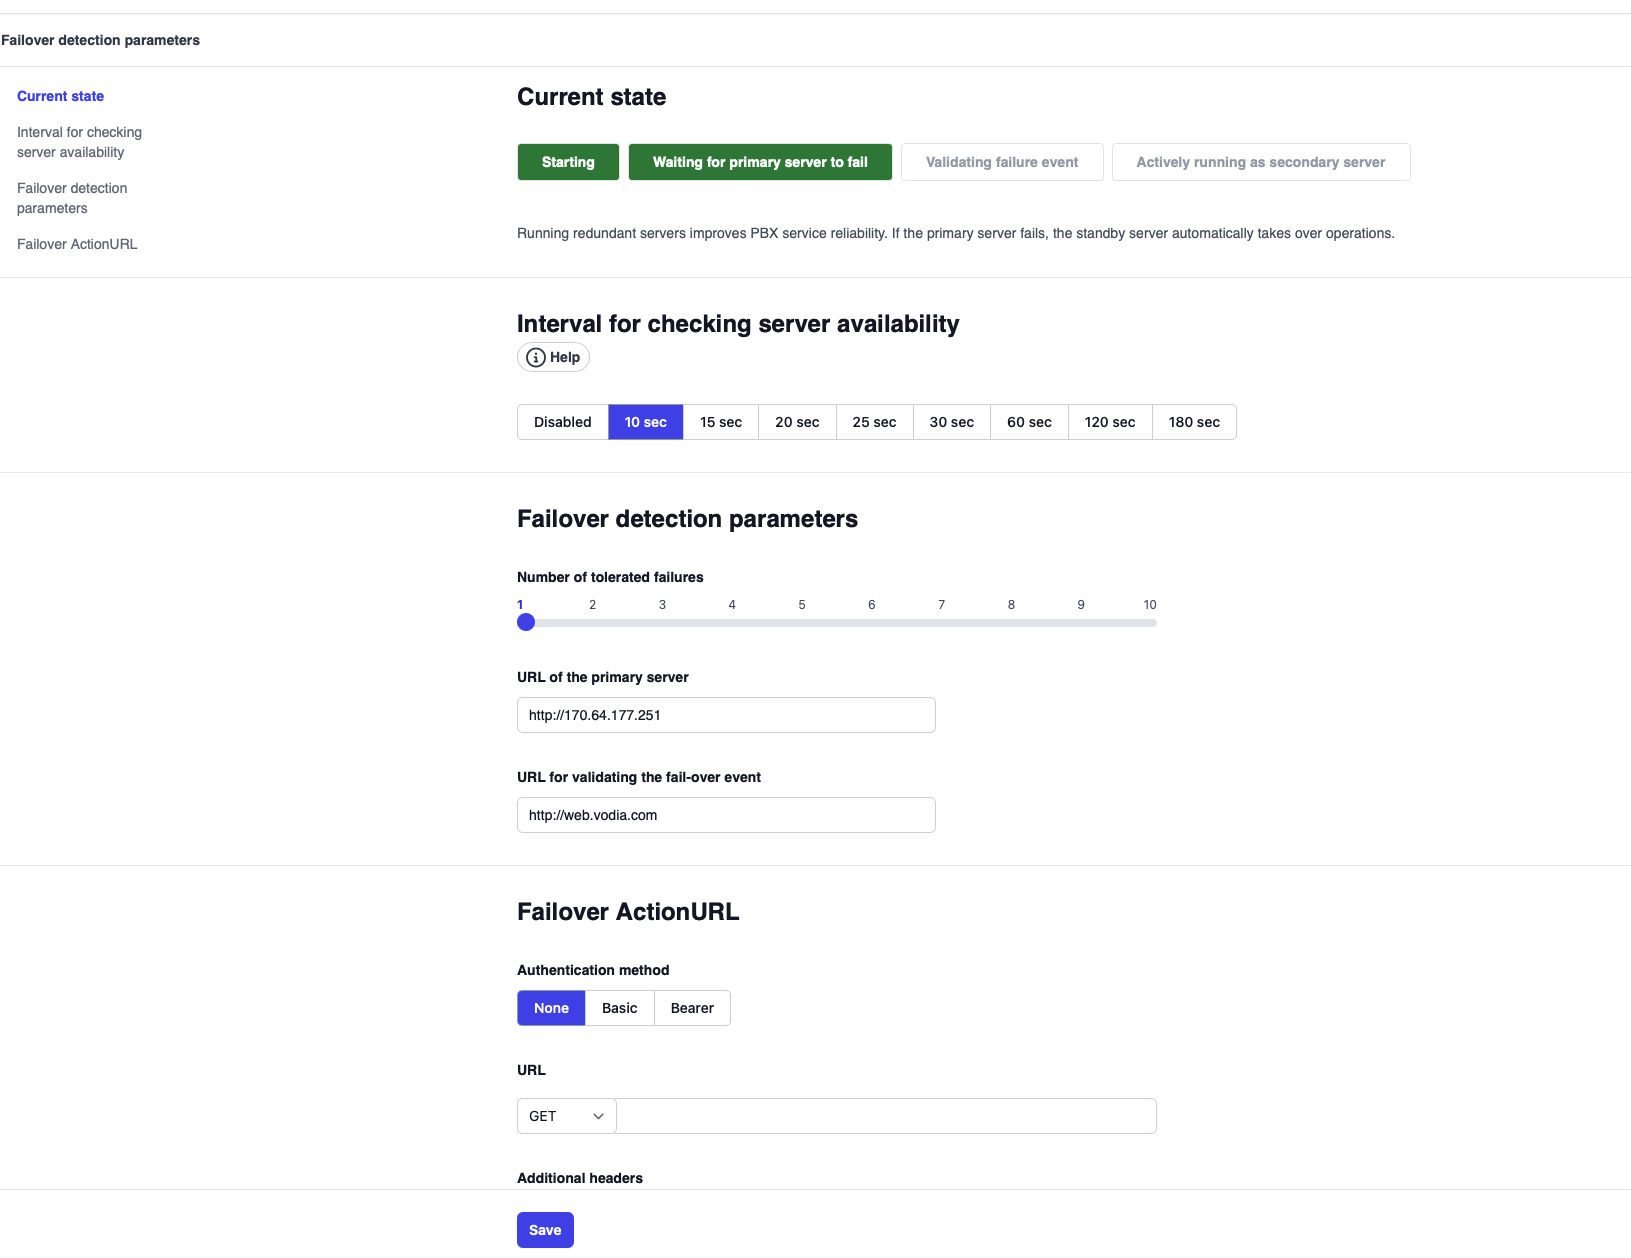
Step 8: Configure Failover Settings
On the secondary server, navigate to Admin → Settings → Network → Failover.
Configure the following parameters:
Failover Detection Parameters:
| Parameter | Value | Notes |
|---|---|---|
| Interval for checking server availability | 30 seconds | Adjust based on desired detection speed |
| Number of tolerated failures | 3 | Multiplied by interval = detection time |
| URL of the primary server | http://170.64.177.251 | Use IP address to avoid DNS as point of failure |
| URL for validating the fail-over event | http://web.vodia.com | External site to verify internet connectivity |

Failover Action URL (Optional):
Configure an Action URL to trigger DNS changes automatically. Example:
https://your-dns-api.com/update?domain=web.pbx70.vodia-teams.com&some_action
Failover States
Once configured, the secondary server will display one of the following states:
| State | Description |
|---|---|
| Starting | Testing if primary server is operational; will not count failures until primary is detected |
| Waiting for primary server to fail | Primary server is responding; secondary is polling for failures |
| Validating failure event | Primary failure detected; secondary verifying its own internet connectivity |
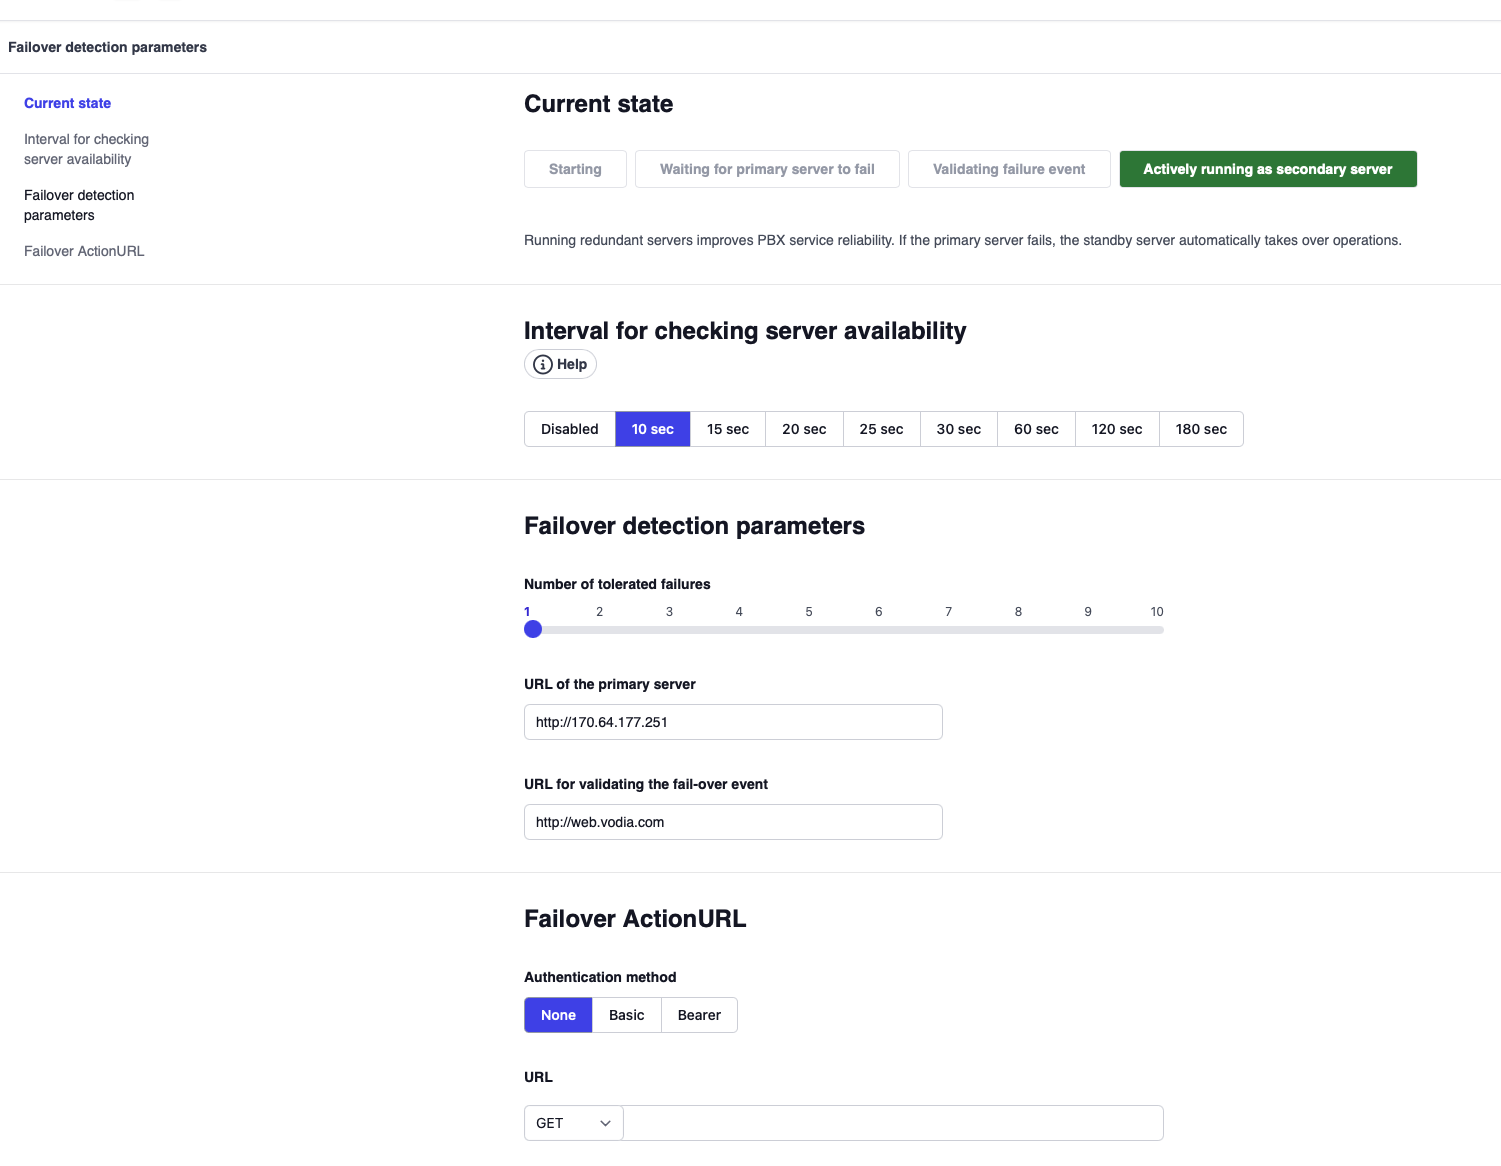
| Actively running as secondary server | Secondary server actively running as primary |
After configuration, you should see the status: "Waiting for primary server to fail"
Note: When in standby mode (Waiting state), all tenants are hidden and not visible in the secondary server interface. During initial setup, tenants may still be visible until the first sync completes and the server enters proper standby mode.
Testing Failover
Triggering a Test Failover
Warning: Always schedule failover tests during maintenance windows or after business hours.
-
SSH into the primary server:
ssh root@170.64.177.251 -
Stop the PBX service:
systemctl stop pbx -
Monitor the secondary server status page. Within the configured detection time (interval × failures), you should see the status change to: "Actively running as secondary server"
-
Verify functionality:
- Test phone registrations
- Make test calls
- Check web interface accessibility
- Verify tenant visibility
Expected Behavior
When the secondary takes over, it will have all configuration changes from the primary up to the last rsync execution. Any changes made on the primary after the last sync will not be present.
Fallback to Primary
Best Practice: Schedule fallback procedures during off-hours or maintenance windows.
Fallback Procedure
-
Stop the PBX service on the secondary server:
systemctl stop pbx -
Start the PBX service on the primary server:
systemctl start pbx -
Verify the primary server is fully operational:
- Check service status:
systemctl status pbx - Access web interface
- Verify phone registrations
- Check service status:
-
Start the PBX service on the secondary server:
systemctl start pbx -
Verify the secondary returns to standby mode with status: "Waiting for primary server to fail"
DNS Considerations
If DNS changes were triggered during failover:
- Update DNS records to point back to the primary IP (
170.64.177.251) - Allow time for DNS propagation (TTL dependent)
- Consider lowering DNS TTL values for faster failover/fallback
License Configuration
Requirements
Both servers must use the same license activation code. The license must include:
- Primary server IP address:
170.64.177.251 - Secondary server IP address:
170.64.166.2
Important Notes
- Standby servers do not affect license metering
- Only active servers are counted in hosted PBX metering
- A failover event will not impact license readout data
- The license file can be replicated as it contains identical content for all servers
Best Practices
Storage and Backup
- Adequate Storage: Ensure the secondary server has sufficient space for full replication
- Backup Schedule: Run additional backups independent of rsync replication
- Test Restores: Periodically test backup restoration procedures
Network Configuration
- Use Domain Names: Always provision using FQDNs, never IP addresses
- DNS Structure: Implement master A record with CNAME aliases
- Low TTL: Set DNS TTL to 60-300 seconds for faster failover
Monitoring
- Health Checks: Implement external monitoring for both servers
- Alert Configuration: Set up notifications for failover events
- Log Review: Regularly review failover logs and sync status
- Network Connectivity: Monitor network paths between servers
Security
- SSH Keys: Use strong key types (ed25519 or RSA 4096-bit)
- Firewall Rules: Restrict rsync access to specific IP addresses
- VPN/Tunnel: Consider VPN connection between data centers
- Access Control: Limit administrative access to authorized personnel