WAN port access on Vodia IO
The WAN port can be used with public IP but also with private IP addresses. By default, the WAN side of the Vodia IO router is not accessible on any port. This makes sense then the WAN port is operated on the public internet. However in many cases, it is desirable to get access from the WAN side of the router, especially when the WAN side is connected to a private network. This page shows how to enable the port for HTTP, HTTPS, SIP and LDAP access.
Use Cases
Typical use cases for enabling WAN access are:
- The router is used as on-premise router and users want to use the PBX from home or road.
- The router is in another LAN where it acts as PBX appliance for devices in that LAN.
If only maintenance access is required, it is also possible to use the system management DNS address together with a load balancer (Settings → General → System).
Separating WAN and LAN
In order to enable the WAN access, you need to log in from a LAN port of the router. This can be one of the four Ethernet connectors for the LAN, but it can also be done from the WiFi network of the router. It is important that there is no network conflict between WAN and LAN, for example if both subnets are 172.16.1.x the router first needs to change to a different subnet. In this case, the LAN port will also be inaccessible because of a routing conflict. In order to resolve the conflict, the WAN port must be disconnected so that the login is possible. After logging in, this is done by changing the local network settings (Router → Local Network) as shown in the image below:
Note: After saving the settings the LAN port settings will require a new login to the router. The new address will be shown on the display of the router. If there is no conflict, this step is not needed.
Enabling Ports
The ports on the WAN side are set in the Router → Advanced Firewall page. The advanced firewall must be enabled:

In order to make a port visible on the router, an entry must be added to the list:
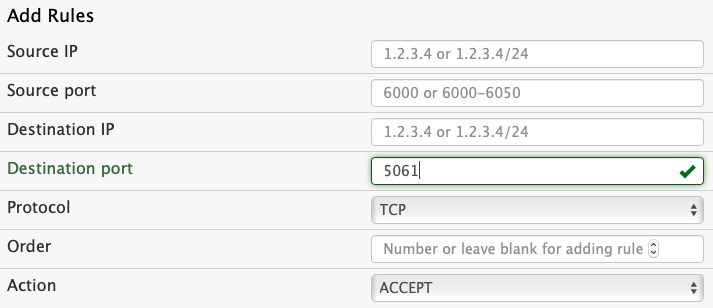
The source IP address and port should be left empty, unless there is a need to limit access to a specific address. The destination IP is typically also not needed unless the access should work only on certain IP addresses.
The destination port is necessary. This paragraph shows the default ports; however it makes sense to choose non-standard ports if you want to use the device on a public IP address. The provisioning of the PBX automatically takes the ports that were set up on the PBX, so that there is usually no need to use the default SIP ports. If the device should generate X.509 certificates, port 80 must be used for HTTP. The default port numbers are 80 for HTTP, 443 for HTTPS, 5060 for SIP, 5061 for SIPS. If you are using LDAP, the default LDAP ports on the PBX are 2345 and 2346. You can double check what ports were set on the PBX page of the router where you can change port numbers if needed. If you want to use SIP on UDP transport layer, you should enable port 5060.
If you want to make phone calls, you should also enable the RTP ports. By default the port range is 49152-65535 (Settings → SIP → Audio), however on the Vodia IO box the range can be smaller, e.g. 50000-50099.
Unless you specifically want to set the order, leave the order field empty. The default action it to accept the traffic. You can use this form also for denying access. After adding the entries, you should see the open ports in the list like below:

You should then be able to access the router from the WAN port.
Steps to protect the system
If the router exposes ports to the public internet, it is recommended to take additional steps to reduce the risk of attacks.
- You should provide a DNS name to the system (set system management DNS address in Settings → General → System) and enable the automatic generation of a security certificate (set ACME Directory URL in Settings → General → System).
- Change the name of the default domain from localhost to a DNS address (in Domain → List). This can be the same as the system management DNS address.
- Enable packet filtering by setting the ignore packets that do not match a domain on the system setting to on (in Settings → Security → General).
- Consider whitelisting addresses for administrator login (Allow login only from listed addresses in Settings → Security → General), for example allow administrator login only from LAN addresses.
- Move SIP port 5060 to a random port (e.g. 8765) to minimize the exposure to port scanners.