Microsoft Teams Integration
You can use the “Direct Routing” feature of Microsoft Teams to integrate with the Vodia PBX, explained on Microsoft® site here:
https://docs.microsoft.com/en-US/microsoftteams/direct-routing-configure
Especially “Plan Direct Routing” and “Configure Direct Routing”. This document presents it in a single step by step process to present it in a simplified way for integrating with the Vodia PBX, including the steps required on the Vodia PBX side.
Pre-Requisites
- Microsoft Teams Account: One or more users with licenses that support Direct Routing (e.g., Microsoft Teams Phone Standard, E3 with Phone System add-on, E5, or Business Voice).
- Calling Policy: Ensure "Prevent toll bypass and send calls through the PSTN" is set to Off in the user's calling policy (Teams Admin Center → Voice → Calling policies).
- Vodia PBX
- Version 69.5.17+
- Hosted PBX edition or collaboration license from Vodia
- Tenant with a valid TLS certificate
Network: Public IP address recommended for easier setup. Private IP addresses require proper firewall configuration and additional PBX settings.
Vodia PBX configuration
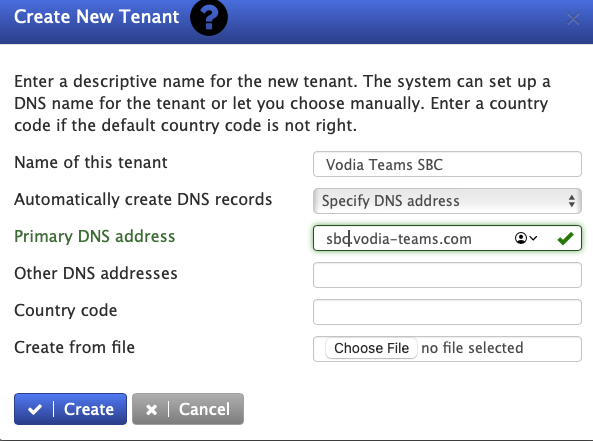
- Create a tenant with a Fully Qualified Domain Name (FQDN) that will serve as the SBC for Teams enrollment.
- Version 69
- Version 70

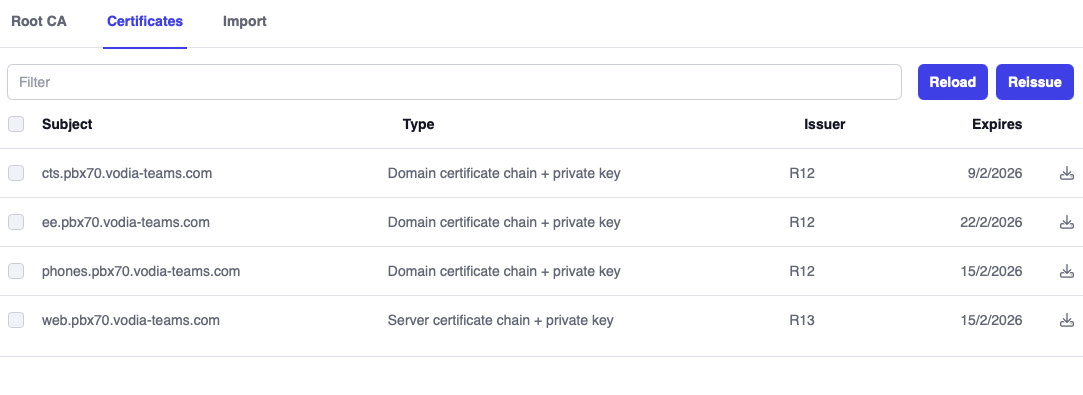
- Ensure the tenant has a valid certificate.
- Version 69
- Version 70

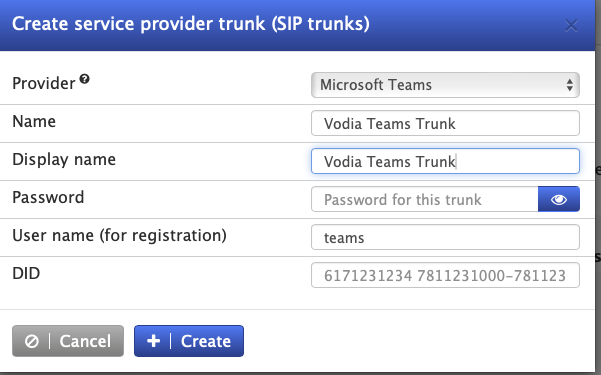
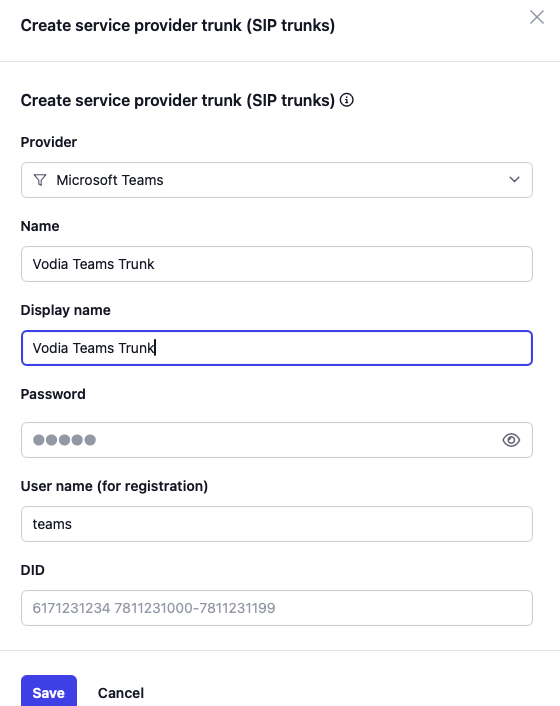
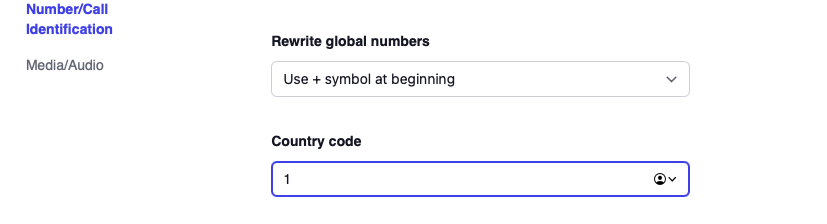
- Create a Teams trunk using Vodia's predefined template, remembering to set the country code.
- Version 69
- Version 70
- Version 69
- Version 70

-
Create a generic SIP trunk for routing inbound and outbound calls for Teams users.

-
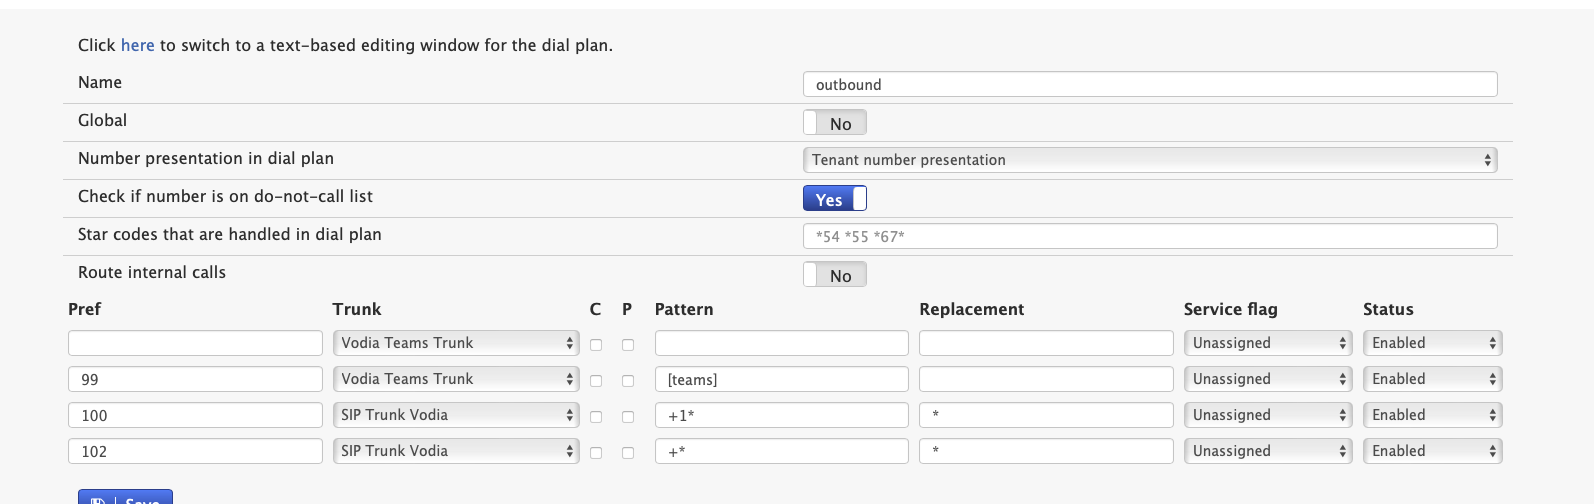
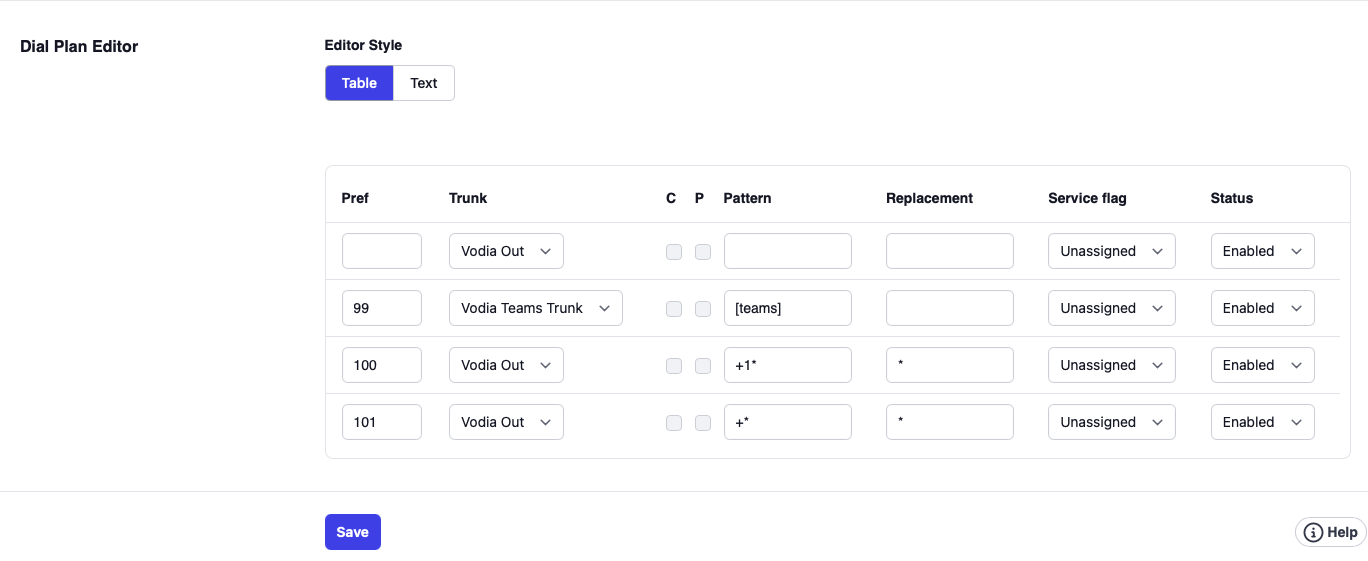
Configure the dial plan as depicted in the screenshot and assign it as default dialplan within the tenant's general settings. This is where you can normalize numbers (e.g., remove the '+' sign). Importantly, note the entry labeled
[teams]for the Teams trunk, as this is crucial for proper routing of Teams calls. This entry should have the highest preference.
- Version 69
- Version 70
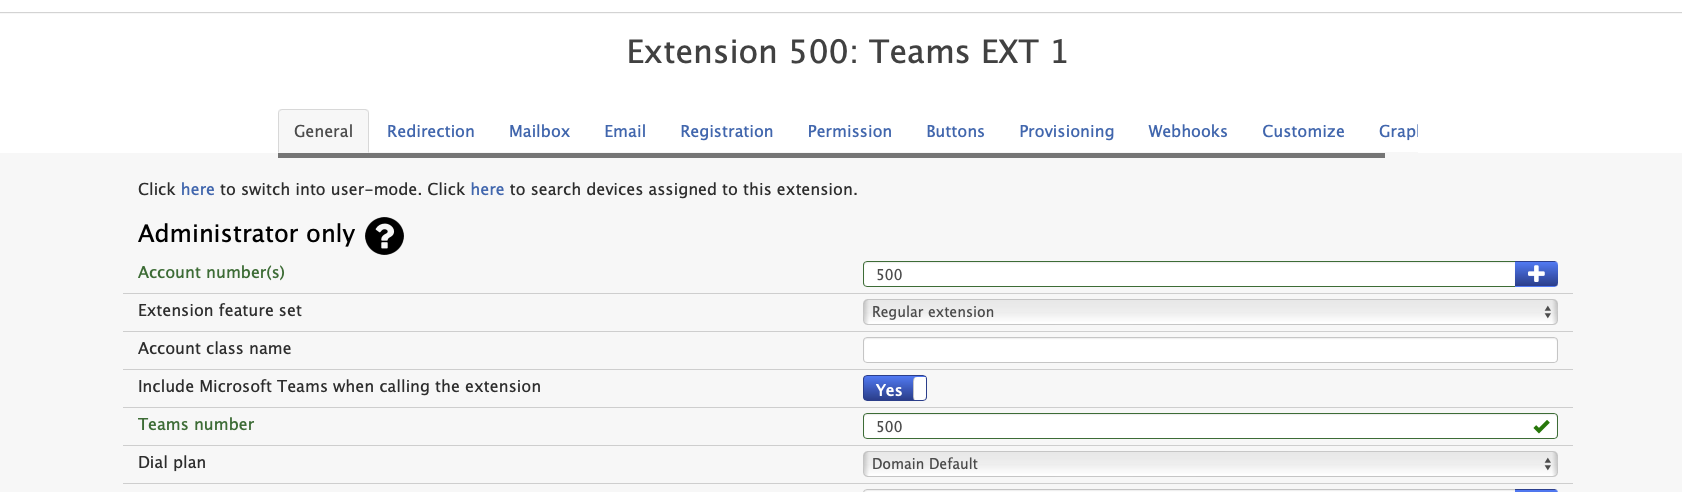
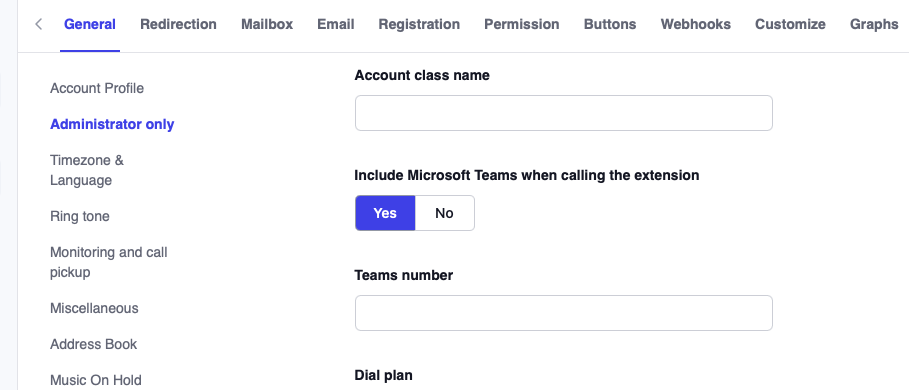
- Create extensions and assign a Teams number to each. Remember to enable the Include Microsoft Teams when calling the extension setting. For call queues make sure you turn on the setting Include calling teams extensions in queue as queue agents under tenant general settings.
You must ensure the number in the Teams number field exactly matches the number configured in Teams (e.g., +500 in both places). This exact match is required so that when Teams routes a call to the PBX, it correctly associates the call with this extension and uses its dialplan and Caller ID.
- Version 69
- Version 70
We recommend using your existing extension numbers as the Teams numbers. Additionally, map any external Direct Inward Dialing (DID) numbers to their corresponding extensions within your Vodia PBX.
Microsoft Teams Direct Routing Configuration Guide
You could use the vodia-teams NPM tool to configure the Teams tenant for direct routing.
All PowerShell equivalent commands are provided for each step where applicable. sbc.vodia-teams.com is an example tenant
Prerequisites
- Global Administrator or Teams Administrator access
- Domain ownership and DNS access
- SBC FQDN (e.g., sbc.vodia-teams.com)
- Valid TLS certificate on SBC
Step 1: Add and Verify Domain
Web Portal
- Go to Microsoft 365 Admin Center (admin.microsoft.com)
- Navigate to Settings → Domains → Add domain
- Enter domain name (e.g., vodia-teams.com)
- Add the provided DNS TXT record to your domain registrar
- Wait 15-30 minutes for DNS propagation
- Click Verify
Step 2: Configure Session Border Controller (SBC)
Web Portal
- Go to Teams Admin Center (admin.teams.microsoft.com)
- Navigate to Voice → Direct Routing → SBCs
- Click + Add
- Configure:
- FQDN: sbc.vodia-teams.com
- Enabled: On
- SIP signaling port: 5061
- Max concurrent sessions: 100
- Click Save
PowerShell
connect to your tenant
# Connect using device code authentication
Connect-MicrosoftTeams -UseDeviceAuthentication

# Verify connection
$connectionInfo = Get-CsTenant -ErrorAction Stop
Write-Host "Connected to tenant: $($connectionInfo.DisplayName)"
$sbcFqdn = "sbc.vodia-teams.com"
$sipPort = 5061
$maxConcurrentSessions = 100

# Check if SBC exists
$existingSbc = Get-CsOnlinePSTNGateway -Identity $sbcFqdn -ErrorAction SilentlyContinue

if ($existingSbc) {
    # Update existing SBC
    Set-CsOnlinePSTNGateway -Identity $sbcFqdn -SipSignalingPort $sipPort -MaxConcurrentSessions $maxConcurrentSessions -Enabled $true
} else {
    # Create new SBC
    New-CsOnlinePSTNGateway -Fqdn $sbcFqdn -SipSignalingPort $sipPort -MaxConcurrentSessions $maxConcurrentSessions -Enabled $true
}

# Verify configuration
$sbcConfig = Get-CsOnlinePSTNGateway -Identity $sbcFqdn
Write-Host "FQDN: $($sbcConfig.Fqdn)"
Write-Host "SIP Port: $($sbcConfig.SipSignalingPort)"
Write-Host "Max Sessions: $($sbcConfig.MaxConcurrentSessions)"
Write-Host "Enabled: $($sbcConfig.Enabled)"
Step 4: Create PSTN Usage
Web Portal
- Go to Teams Admin Center → Voice → Direct Routing
- Click Voice routing policies tab → PSTN usage records tab
- Click + Add
- Enter name: "vodiaPSTNUsage"
- Click Save
PowerShell
$pstnUsageName = "vodiaPSTNUsage"

# Check if usage exists
$currentUsage = Get-CsOnlinePstnUsage

if ($currentUsage.Usage -contains $pstnUsageName) {
    Write-Host "PSTN Usage $pstnUsageName already exists."
} else {
    Write-Host "Creating PSTN Usage..."
    Set-CsOnlinePstnUsage -Identity Global -Usage @{Add=$pstnUsageName}
}
Step 5: Create Voice Route
Web Portal
- Go to Voice → Direct Routing → Voice routes
- Click + Add
- Configure:
- Name: vodia-Outbound-Route
- Dialed number pattern:
.*(matches all calls) - Priority: 1
- PSTN usage: vodiaPSTNUsage
- SBCs: sbc.vodia-teams.com
- Click Save
PowerShell
$routeName = "vodia-Outbound-Route"
$routePattern = ".*"
$sbcFqdn = "sbc.vodia-teams.com"
$pstnUsageName = "vodiaPSTNUsage"

# Remove existing route if it exists
$existingRoute = Get-CsOnlineVoiceRoute -Identity $routeName -ErrorAction SilentlyContinue
if ($existingRoute) {
    Remove-CsOnlineVoiceRoute -Identity $routeName -Confirm:$false
}

# Create voice route with priority 1
New-CsOnlineVoiceRoute -Identity $routeName -NumberPattern $routePattern -OnlinePstnGatewayList $sbcFqdn -OnlinePstnUsages $pstnUsageName -Priority 1

# Verify and update priority if needed
Start-Sleep -Seconds 2
$verifyRoute = Get-CsOnlineVoiceRoute -Identity $routeName
if ($verifyRoute.Priority -ne 1) {
    Set-CsOnlineVoiceRoute -Identity $routeName -Priority 1 -Confirm:$false
}

# Ensure this route has highest priority
$allRoutes = Get-CsOnlineVoiceRoute
$otherPriority1Routes = $allRoutes | Where-Object { $_.Identity -ne $routeName -and $_.Priority -le 1 }

if ($otherPriority1Routes) {
    $counter = 2
    foreach ($route in $otherPriority1Routes) {
        Set-CsOnlineVoiceRoute -Identity $route.Identity -Priority $counter -Confirm:$false
        $counter++
    }
}

# Verify and Display configuration
$route = Get-CsOnlineVoiceRoute -Identity $routeName
Write-Host "Identity: $($route.Identity)"
Write-Host "Number Pattern: $($route.NumberPattern)"
Write-Host "Gateway: $($route.OnlinePstnGatewayList)"
Write-Host "Priority: $($route.Priority)"
Step 6: Create Voice Routing Policy
Web Portal
- Go to Voice → Voice routing policies
- Click + Add
- Configure:
- Name: vodia-Voice-Policy
- PSTN usage records: Add "vodiaPSTNUsage"
- Click Save
PowerShell
$policyName = "vodia-Voice-Policy"
$pstnUsageName = "vodiaPSTNUsage"

# Check if policy exists
$existingPolicy = Get-CsOnlineVoiceRoutingPolicy -Identity $policyName -ErrorAction SilentlyContinue

if ($existingPolicy) {
    # Update existing policy
    Set-CsOnlineVoiceRoutingPolicy -Identity $policyName -OnlinePstnUsages @{Add=$pstnUsageName}
} else {
    # Create new policy
    New-CsOnlineVoiceRoutingPolicy -Identity $policyName -OnlinePstnUsages $pstnUsageName
}

# Verify and Display configuration
$policy = Get-CsOnlineVoiceRoutingPolicy -Identity $policyName
Write-Host "Identity: $($policy.Identity)"
Write-Host "PSTN Usages: $($policy.OnlinePstnUsages -join ', ')"
Step 7: Assign Phone Numbers to Users
Web Portal
- Go to Teams Admin Center → Users → Manage users
- Select a user → Account tab
- Under Phone number, click Edit
- Configure:
- Phone number type: Direct Routing
- Phone number: +12065551234 (E.164 format) or extension (e.g., 1001)
- Click Save
PowerShell
$userPrincipalName = "user@vodia-teams.com"
$phoneNumber = "+12065551234"  # or extension like "1001"

# Check if user exists
$existingUser = Get-CsOnlineUser -Identity $userPrincipalName -ErrorAction SilentlyContinue

if ($existingUser) {
    # Assign phone number
    Set-CsPhoneNumberAssignment -Identity $userPrincipalName -PhoneNumber $phoneNumber -PhoneNumberType DirectRouting
    Write-Host "Phone number assigned"
}
Step 8: Enable Enterprise Voice
Enterprise Voice cannot be enabled through the web portal. Must use PowerShell.
PowerShell
$userPrincipalName = "user@vodia-teams.com"

# Enable Enterprise Voice
Set-CsUser -Identity $userPrincipalName -EnterpriseVoiceEnabled $true
Write-Host "Enterprise Voice enabled"
Step 9: Assign Voice Routing Policy
Web Portal
- Go to Users → Manage users
- Select user → Policies tab
- Under Voice routing policy, select "vodia-Voice-Policy"
- Click Save
PowerShell
$userPrincipalName = "user@vodia-teams.com"
$policyName = "vodia-Voice-Policy"

# Assign voice routing policy
Grant-CsOnlineVoiceRoutingPolicy -Identity $userPrincipalName -PolicyName $policyName
Write-Host "Voice routing policy assigned"
Step 10: Verify User Configuration�
Web Portal
- Go to Users → Manage users → Select user
- Check Account tab:
- Phone number is assigned
- Phone number type shows "Direct Routing"
- Check Policies tab:
- Voice routing policy is assigned
PowerShell
$userPrincipalName = "user@vodia-teams.com"

# Verify user configuration
$userConfig = Get-CsOnlineUser -Identity $userPrincipalName | Select-Object UserPrincipalName, LineUri, EnterpriseVoiceEnabled, OnlineVoiceRoutingPolicy

Write-Host "User: $($userConfig.UserPrincipalName)"
Write-Host "Phone Number: $($userConfig.LineUri)"
Write-Host "Enterprise Voice: $($userConfig.EnterpriseVoiceEnabled)"
Write-Host "Voice Policy: $($userConfig.OnlineVoiceRoutingPolicy)"
Complete Configuration (Full User Setup) via Powershell commands
PowerShell - Complete User Configuration
# Connect
Connect-MicrosoftTeams -UseDeviceAuthentication
$connectionInfo = Get-CsTenant -ErrorAction Stop

# Define variables
$userPrincipalName = "user@vodia-teams.com"
$phoneNumber = "+12065551234"  # or extension like "1001"
$policyName = "vodia-Voice-Policy"

# Check user exists
$existingUser = Get-CsOnlineUser -Identity $userPrincipalName -ErrorAction SilentlyContinue

if ($existingUser) {
    # Assign phone number
    Set-CsPhoneNumberAssignment -Identity $userPrincipalName -PhoneNumber $phoneNumber -PhoneNumberType DirectRouting

    # Enable Enterprise Voice
    Set-CsUser -Identity $userPrincipalName -EnterpriseVoiceEnabled $true

    # Assign voice routing policy
    Grant-CsOnlineVoiceRoutingPolicy -Identity $userPrincipalName -PolicyName $policyName

    # Verify configuration
    $userConfig = Get-CsOnlineUser -Identity $userPrincipalName | Select-Object UserPrincipalName, LineUri, EnterpriseVoiceEnabled, OnlineVoiceRoutingPolicy

    #diaply stored data
    Write-Host "User: $($userConfig.UserPrincipalName)"
    Write-Host "Phone Number: $($userConfig.LineUri)"
    Write-Host "Enterprise Voice: $($userConfig.EnterpriseVoiceEnabled)"
    Write-Host "Voice Policy: $($userConfig.OnlineVoiceRoutingPolicy)"
}

# Disconnect
Disconnect-MicrosoftTeams
Troubleshooting
SBC Not Connecting
# Check SBC status
Get-CsOnlinePSTNGateway -Identity sbc.vodia-teams.com
- Verify DNS resolution
- Check TLS certificate validity
- Confirm port 5061 is open
User Can't Make Calls
# Verify user configuration
Get-CsOnlineUser -Identity user@vodia-teams.com | Select-Object LineUri, EnterpriseVoiceEnabled, OnlineVoiceRoutingPolicy
- Ensure phone number is assigned
- Verify Enterprise Voice is enabled
- Check voice routing policy is assigned
Check Voice Routes Priority
# List all routes with priorities
Get-CsOnlineVoiceRoute | Select-Object Identity, Priority, NumberPattern
- Lower priority number = higher priority
- Ensure your route has Priority 1
Quick Reference
Connection URLs
- M365 Admin Center: https://admin.microsoft.com
- Teams Admin Center: https://admin.teams.microsoft.com
Time Estimates
- Domain Verification: 15-60 minutes
- SBC Configuration: 5-10 minutes
- Voice Routing: 10-15 minutes
- Per-User Config: 2-5 minutes
- Total: 1-2 hours + user configuration time